How to close the entrance to the booth in winter. Preparing the dog house for the cold
Pet owners usually decide in favor of their pets whether they need warm housing. They are serious about the problem of how to insulate a dog house for the winter, they know how to create normal conditions for wintering pets.
Regardless of the breed, the pet needs to find a place on the estate, from where the house, the gate, and most of the yard will be visible. The watchman needs to see the protected area.
The dog house should not be located in the wind, under the open sun, the entrance should not be flooded with rain, covered with snow. Nearby you can not place buildings for animals or birds - dogs are sensitive to smells.
The pet should like the chosen place. If he likes to lie, climbing higher, they arrange a dwelling with a flat roof and set it on a hill.

Design, dimensions
In windy cold weather, the dog, huddled in the far corner of the booth, is warmed by its warmth. In summer, when the shelter becomes stuffy, he prefers to survey the surroundings, leaning out or sitting on the roof of the booth.
Therefore, it is advisable to arrange a dwelling from two departments. The first is a remote windward place behind the internal partition, where the dog will sleep in winter. The second is an entrance vestibule open to the outside, so that in summer it can hide from the heat, fall apart, stretching out its paws.
Given these considerations, the dimensions of an adult animal determine the internal dimensions of the dog house. The height is set according to the growth of the dog at the withers, adding 15 cm, the depth - along its length from the withers to the ends of the paws in the prone position, plus 15 cm.
The width of the bedroom is determined by the length from the nose to the root of the tail, adding 15 cm, the entrance vestibule - adding another 10. The height of the entrance is arranged according to the growth of the animal at the withers, subtracting 5 cm, the width - by the size of the chest plus 5 cm. body, it will be comfortable when living.

Reducing heat loss
Heat loss will be much less if the booth is built without gaps, a tarpaulin or felt curtain is installed above the inlet. For convenience, the canopy is cut into strips in height, fastened above the manhole with a bar. The size should be sufficient to block the entrance on the sides and bottom. Additional comfort is created by a piece of felt or a wrinkle-resistant bedding on the floor.
Such priority warming of the booth for the dog significantly reduces its heat loss and is sufficient for thick-haired breeds.
Short-haired dogs can winter in a booth if the structures do not allow heat to pass through. Therefore, to reduce heat transfer, they are provided with an insulating material (insulation).

Types of thermal insulation
General requirements:
- high insulating properties - heat transfer through the material should be minimal;
- environmental safety - no dust formation, emission of harmful substances;
- fire resistance;
- biological stability - inedibility for rodents, moths; resistance to mold, fungus, microorganisms;
- durability, ability to retain shape, ease of use.
Sheet felt - made from sheep wool, is a unique insulation used in many industries, construction.
The material breathes, does not support combustion - it goes out if it is set on fire. It has low thermal conductivity, low weight, keeps its shape well, does not gain moisture. Microorganisms, fungi, mold do not start in it. Produced in roll form, convenient for work. These properties make it one of the best for thermal insulation. dog house. In application, an inexpensive analogue, technical felt, is also quite good.

Before starting work, measurements are made of the internal surfaces of the house, including the floor and ceiling. According to the obtained dimensions, patterns are made with scissors or a knife. Felt sheets are fastened with capped nails. Reflective foil is additionally placed under the felt for better heat retention. On the side walls, the floor is sometimes covered with board or plywood so that the insulation lasts a long time.
Mineral wool - artificial fibrous materials with high thermal insulation properties. In terms of thermal characteristics, they are at the level of foam plastic. They have high fire and biological resistance.
The main disadvantage of most of these heaters is the presence of fine glass in the composition of wool, which requires good surface insulation on both sides. They are characterized by increased fragility, danger during work. Violation of the skin is fraught with danger to the pet.
Polyfoam exists in two modifications: molded and extruded polystyrene foam ( tradename penoplex). Both can be used for warming the booth. The first is brittle, combustible, absorbs moisture. It is used as a heater laid in the cavity, covered with waterproofing. To avoid damage, the foam is covered with plywood or board sheathing.
The second is a durable, moisture-resistant, non-flammable, dense material. Due to its low thermal conductivity, it practically does not transmit heat.
When insulating an existing large-sized booth from the inside without dismantling it, only by removing the roof, it is better to use expanded polystyrene. It comes in solid, lightweight, conveniently sized plates that won't significantly reduce living space.
With new construction, any of the materials will do. Each structural element of the dog house is made and insulated separately.

Foamed polyethylene (trade name - penofol) - rolled two-layer material for thermal insulation, equipped with one or two layers of foil. The standard thickness is 2-10 mm, the reflectance is over 90%. Unlike analogues, it does not accumulate, but reflects thermal radiation. Moisture-resistant material, non-flammable, easy to use, resistant to weather conditions, aggressive environment. They perform insulation both inside and outside, followed by cladding.
Hay. Warming with hay is quite simple. Before the cold weather, a cover made of tarpaulin or burlap is fixed on the outside of the dog house. Hay is stuffed around the cover, which serves as a heater. If snow falls from the sides - it does not matter. Laying hay inside is not practical - replacing it with a fixed roof covered with a cover will be a problem. It is more rational to put felt on the floor. Before melting, the snow is discarded, the cover is removed.
Liquid insulation. It is made on the basis of water or varnish. Supplied in bottles. It has a pasty consistency, due to which it is easily sprayed, applied with a brush. It has good adhesion to any material. The product is non-flammable, does not emit hazardous substances, has a low cost, is easy to apply. Several of its layers on the structures increase the temperature in the premises by 2-4 °C.

Warming
When the existing structure is insulated from the inside, all its internal dimensions will be reduced, which will create inconvenience for the pet due to tightness. In addition, work inside is difficult - it is preferable to produce insulation from the outside.
They start from the bottom, for which the roof is removed, the dog house is turned over. The bottom is cleaned of dirt, treated with an antiseptic, covered with roofing material. Having decided how to insulate, wooden blocks of the required height are stuffed around the perimeter and in the middle of the bottom as a log.
According to the size of the resulting nests, thermal insulation and a layer of roofing material are cut and laid. They complete the work on the bottom with a boardwalk with antiseptic treatment.
Insulation of all side walls, roofs is carried out according to the stated sequence. For insulation, felt, polystyrene, expanded polystyrene, foamed polyethylene and other materials are used.
The height of the bars stuffed for laying the selected insulation is set according to its thickness. Waterproofing is carried out using roofing material, glassine, polyethylene film, and other film materials. The outer skin is made of plywood, profiled sheet, board and other materials.

Important! Insulation work should be accompanied by smoothing out sharp corners, burrs, protrusions, elimination of cracks on the floor so that the pet does not get a splinter, does not break the claw.
Electric heating
They are used when the possibilities of insulating materials have been exhausted. They are used instead of warming, when they consider it inappropriate, if you need a quick result during a cold snap.
To apply heating, an electric line is connected to the booth, a waterproof socket is installed.
Important! The laying of electrical cables across the territory is carried out secretly in polyethylene pipes low pressure or in metal with a wall thickness of more than 2 mm.
All purchased heaters operate in the infrared range, which is beneficial for the animal. They do not create excessive heat, consume a small amount of electricity, are silent, do not burn oxygen, and are reliable in service.
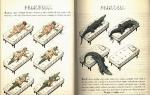
Types of heaters:
- Panel
It is produced in the form of a heating plate 2 cm thick. The heating temperature is up to 50 °C. It is fastened with ordinary self-tapping screws, the installation site is a wall. Has a temperature controller. For insurance, a protective metal mesh is installed on top.
- Film
It is produced in the form of a heating roll, the heating temperature is up to 60 °C. The radiation does not harm the dog, because it corresponds to the natural radiation of the body. Mounted inside the wall of the dog house on a substrate of a reflective screen and a layer of mineral wool. Be sure to cover the inner lining.

- Flexible
Represents the most modern type of heater. Made as a hanging rug 50 cm wide, can be up to several meters long. It is hung on the wall of a dog's dwelling, protected from mechanical damage by a grate. Simple constructively, durable in operation, harmless to the health of the pet.
- Warm floor
Installed under the floor boards. The heating element is made in the form of a thin plastic plate. Complete with thermostat and temperature sensor. It is protected from moisture ingress by a film. It heats the floor boards within 40 ° C without overheating and causing damage to the health of the pet.
- Homemade
They may differ in design, principle of operation. Must not create a risk of fire, electric shock, overheating of the animal. Must comply with electrical installation regulations.
Summary
How to insulate a doghouse, everyone decides on their own, based on its internal dimensions, available materials, and financial capabilities.
Important! No matter how insulated the dwelling is, in severe frosts the dog must be treated like a human being and invited into the house.
All owners of country houses make sure that it is warm and cozy in winter. But what about a pet - a dog guarding the yard from ill-wishers? Is she cold too? Yes, that's why her booth needs to be insulated. So, today we will tell you how to insulate a dog house.
Do you need to insulate your dog house?
Do dogs have enough wool to stay warm in winter? Let's make a reservation right away that at this time of the year the dogs are definitely cold, especially if they are not long-haired, and the booth can not only freeze, but also, for example, leak, drafts may appear in it. And if your dog is really your best friend, then treat him properly and make sure that he has the appropriate conditions for wintering.

First, it is checked whether the booth is located correctly, or whether it needs to be moved. The main requirements are listed below.
- If possible, the entrance to the booth should be located where there is calm (that is, minimal wind movement).
- Ideally, the house should be made of natural wood.
- During precipitation, water should not flow inside the booth, so two options are possible: place the structure on a hill or take care of high-quality insulation.
- The dimensions of the house should fit the size of the dog: it is important that he is not cramped in it, but excessive spaciousness is also inappropriate.
- It is impossible that the kennel was unprotected from the sun, but excessive shading is also unacceptable - look for the "golden mean".

How to insulate the hive for the winter
Earlier we talked about how to properly insulate the hive, what materials should be used, in addition to this article, we advise you to read this information.
When insulating a booth, you need to act the same way as when insulating other structures: all the nuances are taken into account, including wind protection, protection from moisture and cold. Internal insulation is advisable for structures that can be easily dismantled / assembled back.
Note! If the kennel is already ready, and there is no way to disassemble it, then give preference to external insulation. In this case, you will need a final finish so that the booth looks good on the site.
Finally, for greater confidence in the results, insulate everything at once - the roof, walls and floor.
Basic requirements for thermal insulation of the kennel
First, one important point needs to be clarified: we are talking about a creature that is guided, first of all, by its own instincts. You can't tell him what to do and what not to do. Therefore, certain requirements must be followed.
The walls of the insulated kennel should not be such that they can be easily damaged.
It is better to give preference to natural heat insulators, which emit a minimum amount of harmful substances into the atmosphere.
A great idea is the arrangement of the canopy. It is important that it is very durable, because the dog will most likely want to play with it. Vinyl or a regular tarp, most likely, will not be able to hold out for a long time (more on the canopy in the next paragraph of the article).

Finally, the insulation should be qualitatively isolated from the interior of the kennel. Mineral wool, for example, irritates the human respiratory system, and there is nothing to even talk about a sensitive dog's sense of smell.
Now let's find out how to insulate a dog house and what materials to use for this.
Installing a curtain (canopy) in a kennel
The hole in the kennel should be protected from the penetration of precipitation - this will require a special curtain. Often, tarpaulin or rubber is used for its manufacture. Also, the curtain should be somewhat weighted so that it does not sway from the wind. You can, for example, sew small pockets to the bottom of it and fill them with sand.

By the way, ready-made canopies or curtains are also sold today, they can be found in many specialized stores.

How to insulate a frame house
Earlier, we talked about several options for warming a frame house and described the whole process in detail, in addition to this article, we advise you to read this information.
Choosing insulation for a dog house
When choosing one or another insulating material, one should be guided, first of all, by what the booth itself is made of (these can be plates, wood, and so on). Consider the possible options.
Option number 1. mineral wool
This is perhaps the most popular insulating material today, which, however, should be used with extreme care to isolate the kennel. This is explained by the fact that the dog can destroy the insulating layer, because of which it will lose its original characteristics. Moreover, it can harm the health of the animal itself. Finally, due to the small size of the dog house, the isolation procedure will be troublesome and time consuming.

However, if you still prefer mineral wool, then use it in accordance with the following requirements.
- Never use glass wool.
- The insulation layer must be waterproofed without fail.
- Finally, there must be a cladding, no matter what the exterior / interior finish is.
Option number 2. Styrofoam
An excellent heat insulator for use in a kennel. First of all, its thermal insulation parameters are not worse, and in some cases even better than those of mineral wool. In addition, the foam is not so susceptible to external influences, therefore, it does not need waterproofing in principle.

If you liked polystyrene foam for warming the booth, then you should know what types of it exist. Here they are:
- penoplex;
- expanded polystyrene.
Although the dog, be that as it may, will gnaw and scratch the heat insulator, which means that you still have to cover it with something.

Option number 3. Roll type heat insulators
Another option suitable for warming the kennel is rolled thermal insulation materials. It can be, for example, ordinary polyethylene, which is quite easy to fix on the surface even with a stapler (although there are also such modifications of the film that are already on an adhesive basis). Penofol has similar characteristics.

All of these materials have excellent thermal insulation properties, but, again, they need additional sheathing.
Option number 4. Felt
It is a material of natural origin, characterized by safety, affordable price. In a word, for a kennel, this is an ideal option.

We also note that it is vapor-tight, which means that moisture will not accumulate (it will always be dry in the booth). It is not blown by the wind. Finally, it does not need to be covered with something, and ordinary nails can be used for fixing (the main thing is that the caps are large).
Video - Thermal insulation of the pet booth
Instructions for warming the booth
Now let's talk directly about how to insulate a dog house. The procedure consists of several stages, we will get acquainted with each of them in more detail.
Stage number 1. Bottom and floor of the kennel
Step one. First, the floor is insulated and the bottom is protected. To this end, the structure is turned upside down, all surfaces are treated with a special substance (it will protect them from destruction) and covered with roofing material (the latter, by the way, can be fixed with wooden bars). So, the outer floor protection in the kennel is ready.
Step two. The booth is turned back, the warming procedure continues. First, the floor is covered with a waterproofing film (as an option, you can take the same roofing material for this). The material is laid with a slight overlap in order to avoid the appearance of cracks. The joints are shot through with a mounting stapler. It is also desirable that the film be wound up a few centimeters on the walls.
Step three. After that, a layer of insulation is laid, which, in turn, must be closed. If a soft heat insulator or a large volume is used, then it is preferable to fill a miniature analog of lags from the bars so that a finishing floor can be built.

Step four. The finished floor is laid. It can be built from pre-finished boards or, alternatively, plywood, OSB boards.
Step five. It is also desirable to carry out additional insulation work that will protect the kennel from freezing or leakage. Where the structure will be installed, a hole 20 centimeters deep breaks out along its perimeter, expanded clay or gravel “cushion” is poured there, an insulating layer (roofing material or ordinary film) is laid on top with a slight entry to the surface. If the insulation is made from the outside, the film is hemmed under the facing material. When installing the kennel on this kind of base, the freezing of the floor, as well as the flow of moisture inside, is minimized.
Stage number 2. Construction walls
Immediately make a reservation that the procedure for wall insulation depends on the specific material that is used for this. Simply put, you need to act in strict accordance with the manufacturer's instructions. Below is just a brief step-by-step instruction.
Step one. The walls are cleaned and processed.
Step two. If necessary, a waterproofing layer is laid.
Step three. Insulating material is installed.

Step four. If necessary, additional material for vapor barrier is attached.
Step five. The walls are finished (if required by the type of heat insulator used).

Note! The main condition for the thermal insulation of a dog kennel is as follows: it is unacceptable for the structure to have blown areas, as well as for moisture to penetrate inside.
Stage number 3. Ceiling, roof
The ceiling-roof (that is, a single structure, in one design) is suitable for a kennel, which will be located under a canopy in a special enclosure (where water cannot leak), but if not, it is preferable to build a pitched roof for the booth, but in a mandatory detachable type. This is one of the obligatory moments of how to insulate a booth for a dog.

A kind of "attic" of the roof is insulated in the same way as the floor was insulated. First, a polyethylene film for waterproofing is attached, after which - a warming material. Important point: here the insulation installed in the roof does not need to be protected, since the dog will not have access to it in principle. It is also recommended to protect internal slopes from water and wind - to beat them with insulation or insulation around the perimeter floor.
Can a dog kennel be heated?
Let's make a reservation right away that even the highest quality insulating material is unable to properly heat the booth (although there is an exception - if the design has a door with locks and heat insulators). The curtain will protect the pet from wind and precipitation, but it will also not be able to warm it. Therefore, the question arises: is it possible to somehow heat this house? Of course, given the achievements modern technologies we can confidently say that this is also possible, but this will require special heaters.
There are three main methods that are suitable for this case:
- using a panel heater;
- through film;
- using the underfloor heating system.
Let's get acquainted with each of the options in more detail.
Option number 1. Panel type heaters
Such heaters, intended for dog kennels, are produced in metal cases and are characterized by small dimensions (thickness - 20 millimeters, length / width - 600/600 or 500/900 millimeters). Such devices are safe and environmentally friendly, they are easy to install, and the surface in them does not heat up above 50 degrees. Such a panel can be fixed both on the roof and on the walls of the structure. There are several advantages to such heating.
First of all, these are the several installation methods just mentioned.
- The devices work completely silently, which means they will not irritate the dog.
- They don't burn oxygen.
- They consume a small amount of electricity.
- They do not require special maintenance.
Finally, today there are panels with a thermostat installed inside a protective box (this is required to avoid mechanical damage).

Option number 2. Film type heaters
A unique ultra-thin heater, the principle of operation of which is based on thermal infrared radiation. In fact, this device is a roll of a flexible film, which provides heat transfer of infrared rays. Today, this kind of technology is actively used in a variety of premises, so why not use it to heat a doghouse?

Among the main advantages, the following should be highlighted:
- increased efficiency;
- the strips are connected in parallel, due to which the ultimate durability of the unit is achieved (even if one of the elements is mechanically damaged, the rest will continue to function normally after that);
- film-type heaters are completely safe (they transmit thermal energy, but they themselves do not heat up);
- heat in space is distributed as evenly as possible;
- models are very economical;
- they have a positive effect on work immune system(and this is very important!);
several installation methods are possible at once (same as in the previous version).
By the way, you should know about all this even before you insulate the dog house.
Option number 3. "Warm floor"
If you plan to use a “warm floor” in the kennel, then by doing so you will provide the most comfortable living conditions for your pet. Here you will need to install a heating wire that needs to be connected to the power supply. Tellingly, you can either buy a ready-made design or do it yourself (of course, in strict accordance with the requirements for installing electrical appliances).

Are there alternative heating sources?
There are certainly some. For example, even all convector-type heaters are quite suitable for a dog kennel, it is only important that even before installation you familiarize yourself in detail with the technical characteristics of the selected device (such as safety, heating temperature, and so on). Most of all, the so-called convector-mat is suitable for the booth, the main advantage of which is that during operation it does not heat up to high temperature which means it is completely safe for your pet.
As a small conclusion
As a result, it remains only to add that there are a lot of options, as you yourself were able to see. But if you have not yet decided how and how you will insulate the booth for your dog, then we advise you to watch the video below, which has a lot of information on a given topic. That's all, warm winters you and your pet!
Video - Making an insulated dog house
Breeders whose dogs live in a private house on the street often have a question about insulation. And rightly so, because who wants his pet to freeze in the cold? You can learn how to insulate a dog house for the winter from this article.
Choosing a heater
Most dog breeders still recommend warming the home of their pets. Even if part of the heat will always leave through the hole in the booth, insulation is very important. Of all the breeds of animals that exist in the world today, only a few endure severe cold without problems. In particular, it is about Caucasian Shepherds, huskies, huskies and malamutes. However, if you are the owner, for example, of a Doberman or a Rottweiler, then making the insulation of the booth with your own hands is a paramount task.
What you need to consider when choosing a material for insulation is that it is non-toxic and safe. You should always remember that the most sensitive organ of any dog is the nose. Therefore, if the booth after insulation does not smell like it should, the animal may simply refuse to enter it.
As for the material for insulation itself, today the following are most often used for these purposes:
- Sawdust or wood shavings. As practice shows, this material is the most environmentally friendly and safe for the pet's body. Sawdust should simply be poured into the space between the walls. The main disadvantage of such a material is that the wood itself is quickly exposed in wet weather. In addition, sawdust settles quickly, so after two, or maybe even one cold season, you will notice that the material will simply sag in winter.
- Styrofoam can also be used as a material for insulation and heating, although judging by the reviews, this material is ambiguous. Some people say it's harmful, others say it's unsafe, although people have used it with success in cladding houses. The main advantage of polystyrene is that it is not afraid of moisture and practically does not rot. But it will make little sense if the booth is without heating. Also, if you decide to insulate it with your own hands, then you need to remember that the material must be securely insulated so that the dog does not scratch it.
- Mineral wool is also a good option, but many breeders also argue about the issue of safety. As practice shows, the thermal insulation properties of mineral wool are quite high. As in the case of foam, the material must be protected as reliably as possible from the paws of a pet. But it is important not to overdo it and not make the walls of the dog's dwelling too thick.
- You can also use penoplex. Penoplex itself is enough new material for warming. It has been proven to be structurally non-toxic, and generally good enough to be sheathed in a doghouse. On sale you can find penoplex of different thicknesses and sizes.
- As for felt, it is praised by almost all dog breeders and experts, this material is considered one of the best. With it, the walls and roof of the dog house are upholstered. Moreover, if you do it yourself, then this process will not take so much time. In addition, the material is completely safe for the animal.
- For these purposes, you can also use rolled insulation. It is also quite convenient in terms of installation, but also quite effective.
Insulation guide
It is important for you, as the owner, not only to choose the best material for winter insulation, but also to take into account many other issues. For example, how it will be possible to cover the exit from the dog house so that heat does not leave it. Alternatively, you can hang a thick curtain on the manhole, for example, from tarpaulin or felt. In principle, you can use any dense fabric (even an old rug). This curtain can be installed using self-tapping screws and a regular bar and, of course, it will not need to be cut into two or more parts. This is done so that the pet can easily go inside.
Sometimes breeders make a special additional vestibule with their own hands. This will keep most of the heat inside. If you decide to insulate the dog's home on your own, then remember that not only the walls are insulated, but also the floor, as well as the roof. You can lay the same sawdust or hay on the floor, but this bedding will have to be constantly changed. Dog breeders suggest laying ordinary rags or old rugs, but the dog may simply not understand why you did it and tear it.
Such a rug can be replaced with burlap or coarse fabric, and fixed with a wooden frame. In addition, the insulating material should be reliably protected with inside dwellings. For this purpose, it is quite possible to use ordinary plywood, OSB or lining.
Insulation of a doghouse with felt
If you don’t know how to insulate a dog house with your own hands or how to do it right, then we have prepared step-by-step instructions. Consider several options and start with felt.
Tools and materials
What will be required:
- the material itself is artificial felt, about a roll;
- scissors or knife;
- nails with large heads.
Warming with mineral wool
You can also make the insulation of the dog house with mineral wool with your own hands. But keep in mind that compared to the previous version, this one is more complex and laborious. However, mineral wool can provide better thermal insulation, especially if you can do it right.
Tools and materials
What you need:
- a roll or several pieces of mineral wool;
- several wooden bars;
- plywood;
- vapor barrier;
- stapler;
- nails.
Some domestic dog breeders may well build heating on their own at home. For example, for this you can use an ordinary incandescent lamp, which is installed in a jar. That is, it turns out a kind of lampshade. The resulting heating device is installed in an asbestos-cement pipe, according to reviews on the network, such a unit can warm the pet well. Of course, with all handmade devices, you must be most careful to prevent possible fire. It is best to think over that the aviary is already warm with the help of a heating system.
Video "The most efficient way to heat a dog house"
How to quickly and efficiently heat your home pet, look at the video (the author of the video is al zh).
The yard dog is constantly on the street. His health, activity and appearance very dependent on conditions. Maintaining the vitality of a pet in the cold season is possible only with the proper organization of the temperature regime inside the kennel. Consider simple and affordable options for how to insulate a dog house for the winter with your own hands, and also offer the most effective and economical solutions for additional heating of an aviary.
Do I need to insulate the dog house for the winter
Many owners of four-legged pets think about whether the dog is cold in the booth in winter. There is no single answer to the question - it all depends on climatic features region and dog breed.
Cynologists agree that long-haired, wire-haired and short-haired dogs with a thick undercoat can withstand frosts down to -40 ° C. Some breeds, such as the Husky, the Leonberg, the Moscow Watchdog and the Bernese Mountain Dog, prefer to sleep in the snow and stay outside even with the onset of cold weather.
Warm house for a dog
However, whether a dog freezes in a booth in winter depends not only on the breed, but also on the conditions in which the pet grew up. If earlier he lived in an apartment, then it will be difficult for him to spend the winter in a kennel without insulation. In a warm room, dogs shed more and lose their warming undercoat. It is necessary to gradually adapt the animal's body to new living conditions.
If the region is dominated by cold winters with long periods of "minus" temperatures, then it is better not to risk the pet's health and equip warm booth for a dog.

The need for thermal insulation of the doghouse
Compliance with a number of rules will help create an insulated kennel and reduce the heat loss of the structure:
- The entrance to the pet's home is best located in a place where the likelihood of drafts is minimal.
- For the construction of walls, it is desirable to use wood - the material has a low thermal conductivity.
- The dog house must not be placed on bare ground. The structure must be placed on bricks or wooden beams. The air layer will protect the bottom from freezing.
- A draft for dogs is worse than frost. Therefore, the manhole must be curtained with a dense canopy. The material should be dense and weighted so as not to sway in the wind.
- It is important to maintain the optimal size. The dog will be able to heat a compact booth with his breath. However, in a building that is too close, the movement of the animal will be limited.

Calculation of the optimal size of a dog kennel
In the winter booth, it is necessary to exclude leaks - eliminate all cracks on the roof and take care of the waterproofing of the roof even before insulation.
How to insulate a dog house with your own hands
The thermal insulation of the dog kennel is carried out according to the standard technology for warming the living quarters. The method of mounting the insulation depends on the type of construction of the booth: collapsible or solid.
Wall insulation - material selection and instructions
The walls of the collapsible model can be covered with a heat insulator from the inside or outside. If during the construction of a one-piece booth you do not take care of insulation in advance, then the only option for improving the microclimate is the outer skin.
The most popular "internal" heaters for the dog house:
- Mineral wool. The weak side of the insulation is susceptibility to moisture and low strength. Before sheathing the booth with mineral wool, it is necessary to cover the walls with film waterproofing. From above, the insulation must be covered with a sheet of OSB or plywood so that the dog, while playing, does not destroy the insulation.
- Felt is a natural, breathable, safe and affordable material. To insulate a dog house with felt, you will need ordinary nails with hats. The heat insulator does not need additional finishing.
- Roll heaters. Foamed polyethylene, polyethylene foam or penofol are fixed without crates.
To insulate a dog house with outside, you will need foam, polyurethane foam or polystyrene foam.
Styrofoam insulation technology for a dog house:
- From wooden blocks, fill the crate around the perimeter of the kennel.
- Cut foam. The canvases should be 5-10 mm wider than the prepared cells - this will ensure a tight fixation.
- Install the heater in the frame.
- Cover the styrofoam with polyethylene. The protective layer will protect against drafts, and the insulation - from getting wet.
- Perform board finishing. You should not postpone work, as the foam is susceptible to UV rays and moisture.
Insulation of a doghouse with polyurethane foam is rather an additional, rather than the main method. Foam is perfect for "blowing out" slots and holes from the outside of the structure.
Floor insulation options
Arranging a warm floor in a dog house involves laying insulation and bedding. Often the owners use only bedding material. This option is acceptable in warm regions, provided that the building is raised above the ground.
The procedure for warming the bottom and floor with your own hands:
- Turn the kennel upside down and treat with an antiseptic impregnation that prevents the appearance of rot.
- Close the bottom with roofing felt.
- Turn the booth over and line the floor with glassine. Lay the insulating material with an overlap, forming sides around the perimeter with a height of about 10 cm.
- Before installing the insulation, it is desirable to install logs from the bars.
- Put in cells mineral wool, penofol, polystyrene foam or other heat insulator.
- Fill boards or OSB boards as a finishing floor.

Floor insulation with mounting foam
Be sure to lay a litter on top. There are many options for laying a dog in a booth in winter to ensure warmth and dryness.
Hay and straw. The easiest method is to put hay in the dog house. Such bedding will have to be shaken and changed weekly, otherwise the hay begins to cake and become damp.

Use of straw bedding
Mattresses and fabric bedding. On a warm blanket or pillow, you can sew a removable cover that can be washed. The bedding is made from natural, dense fabrics - optimally from wool. The disadvantage of the warming method is the need for frequent drying.
It is better to choose sawdust for a dog in a booth from cedar or pine. The material is soft, absorbs moisture well and repels fleas. It is possible to carry out partial replacement of sawdust.
The use of a heated mat in a dog house requires a 220V power supply. Heating temperature is regulated in the range of 30-70 °C. Beddings are produced from moisture resistant fabric or PVC film.

Heated mat is more suitable for pets
Warming and insulation of the entrance
The final stage of warming is the closing of the manhole. It is the entrance that is the main source of heat leakage. Without high-quality protection of this structural element, all previous actions are meaningless.
How to close the entrance to the dog house for the winter? To solve this issue, curtains and curtains made of tarpaulin, rubber and thick woven materials are usually used.
For self-manufacturing curtains under the manhole you will need:
- piece of dense fabric (worn-out flannelette blanket, felt);
- wooden rail;
- nails or screws;
- scissors;
- a hammer.

Tarpaulin strip curtain
Sequencing:
- From the fabric cut out two identical elements of a rectangular shape. The length of each cut should be equal to the length of the inlet plus 5 cm, and the width should be equal to the height of the manhole.
- Fasten the first piece of fabric, folded in half along the length, onto a wooden rail. The ends of the cut should be at the edge of the crossbar.
- In a similar way, fix the second part of the entrance with an overlap at the junction with the mating half of 4 cm.
- Using self-tapping screws, fasten the rail with a double curtain to the top of the manhole, connect the ends of the canopy with the opposite sides of the entrance. To reduce the likelihood of cracks, it is better to nail the curtain on the sides through a wooden lath.
- Hanging doors should be made heavier by sewing a two-layer edging from the bottom soft tissue. Insert valves will close the formed gap between the curtain and the threshold, providing insulation.

Homemade curtain from a warm blanket
To improve the windproof and thermal insulation qualities of the canopy, four can be used instead of two layers of fabric. An alternative way to increase the effectiveness of the curtain is to install weights. It can be a steel bar or a set of metal plates sewn into the bottom edge of the product.
Among ready-made solutions for insulation, silicone blinds with a thickness of 0.5-1 mm have proven themselves well. The material is not afraid of cold, does not tan in the cold and is unpretentious in operation. The curtain elements are easily bent, opening the passage inside. An additional plus is the affordable cost of a silicone canopy.

Silicone canopy
Heating of the dog house
Heaters that provide high-quality and safe heating for a doghouse must meet a number of requirements: quiet operation, durability, low-temperature mode and heating efficiency. To a certain extent, panel heaters, film thermal insulation and cable underfloor heating have the declared parameters.
Panel heater
The most popular and easy-to-implement DIY heating method is installing a panel heater. Electric infrared panels allow you to maintain optimal temperature indicators inside the dog's home without special expenses for electricity and insulation.
Distinctive features applications of a panel heater in a dog kennel:
- noiselessness of work;
- compactness of the equipment - the standard thickness of the heating model is 2 cm;
- the heating temperature is not more than +50 ° С - due to moderate heating, air is not “burned” and there is no need to close the device with a protective wooden grate;
- ease of installation - the panel is fixed to the surface with self-tapping screws;
- resistance to a humid environment - degree of protection against moisture IP66;
- the presence of fire-fighting characteristics allows the heater to be operated around the clock without monitoring the kennel.

Heating panel for heating the booth
An infrared heater for warming a doghouse operates on the principle of thermal radiation - objects are first heated, which in turn transfer heat to the air.
High-tech models are equipped with a thermostat placed inside a protective metal box with a lock.
Film thermal insulation
Infrared film is an ultra-thin heater, the operation of which is based on the radiation of infrared waves. The heating element evenly distributes heat, preventing overheating of the animal.
A low-temperature film heater, regardless of the manufacturer, consists of three elements:
- Heating element - converts electrical energy into thermal.
- Foil - promotes uniform distribution of heat over the entire surface to be covered.
- Laminated double-sided PET film - provides insulation and protects the internal components of the system from mechanical damage.
A warm booth for a dog with heating from IR film has a number of advantages:
- economical consumption of electricity;
- "healthy heating" - the length of the infrared radiation of the film coincides with the wavelengths emitted by animals, which increases immune functions animal body;
- high level of heat transfer - due to the uniform distribution of energy there are no "cold zones";
- heating foil for dog kennels does not change the humidity of the air.

Infrared film for ceiling or wall mounting
The main disadvantages of the systems: the high cost of insulation and the complexity of installation. The installation technology provides for covering the film heater with a protective coating.
The entire installation process with your own hands can be divided into several stages:
- Surface preparation. It is necessary to level the wall - this is an important condition for uniform heating and uninterrupted operation. It is advisable to insulate the surface before installing the IR film in order to reduce heat loss.
- Film preparation. Perform material cutting. The incision is made strictly along the marked lines. Subsequently, the sites will be connected into a single "warm carpet".
- Installation of a film heat insulator:
- plan the layout, taking into account that the copper busbars are directed to the rough surface;
- remove 1 cm of insulation from the supply wires and put on the terminal;
- attach the films with adhesive tape to the wall, connect and crimp the contacts with pliers;
- close the joints of the wires with insulation.

Joining individual sheets of IR film
After installing the thermostat and temperature sensor, cover the walls with plasterboard or OSB boards.
Cable underfloor heating
An interesting option for creating a heater with your own hands is laying heating cables.

Ready-made purchased system "warm floor"
To create a home-made heating and insulation system, you need to prepare:
- thick plywood;
- wooden bars;
- thermostat;
- heating wire (power 80 W);
- silicone sealant;
- steel wire;
- scotch;
- sand.

An example of a cable underfloor heating
Of the tools useful: electric jigsaw, drill, screws, nails and a hammer.
Assembly technology "warm floor":


- Seal all joints between the bottom of the frame and the bars with adhesive tape.
- Cover the box with sand and check the operation of the system.
- At a positive result- cover the box with a plywood lid.

The "warm floor" system is connected in late autumn
Place the finished structure in the dog's dwelling, connect the cable and lay a rug for the pet.
Alternative heating
In search of an alternative way of heating and warming with their own hands, some owners resort to bold, but not always effective methods:
- Heating the dog house with a light bulb. The heating IR lamp is able to raise the temperature to the desired level. However, the animal runs the risk of overheating or getting burned on a hot device. The minimum distance from the lamp to the dog should be 50 cm, but this is difficult to achieve with standard kennel dimensions.
- Autonomous booth heater. As a rule, devices run on batteries. Some models are heating pads with a filler that retains heat for a long time. In order for the heater to work and accumulate heat, it is preheated. A battery-powered heating pad can be used in a dog house as an addition to the main heating system.
If you wish, you can do the insulation and organize the heating of your beloved pet’s booth with your own hands, spending a minimum of money on work. Technology various methods quite simple and implemented within one or two days.
September 7, 2016
Specialization: master in the construction of plasterboard structures, finishing work and laying flooring. Installation of door and window blocks, facade finishing, installation of electrics, plumbing and heating - I can give detailed advice on all types of work.
If you have a private house and there is a pet that lives on the street, then the issue of building a home for him requires the closest attention. We will figure out how to make an insulated booth in which the dog will be comfortable both in winter and summer, we will also figure out how to choose optimal dimensions what materials to use and in what sequence the work should be carried out.
I have lived almost all my life in the private sector, so I have experience in building booths.
Determination of optimal sizes
This is the most important aspect, because if the dimensions of the structure are not designed for the dog, then it will be uncomfortable for her to stay in the booth. If it is too small, then the dog will be crowded, and if it is too large, then it will be cold in the booth in winter, which is also highly undesirable.
There is a whole algorithm for determining sizes, but I will not bore you with scientific calculations, but will tell you everything as much as possible simple form, in principle, the table below contains information that is suitable in most cases, and below I have outlined the main recommendations that you need to consider:
![]()
- The height of the booth inside should be 10-15 cm higher than the height of the dog, this is taking into account the fact that a warm bedding will be laid on the floor;
- The width should be 10 cm more than the height of the dog so that it can lie on its side with legs extended;
- The length of the booth should be 5-10 cm longer than the length of the dog, while the tail is not taken into account;
- The size of the hole is calculated as follows: its width should be 5 cm more than the width chest dogs, and the height is less than the height of the dog by 5-10 cm.

Now let's deal with the optimal location of the booth, since its choice is also of great importance:
- The kennel should be closed from wind blowing, take into account the predominant direction of movement of air masses and place the structure behind the barrier;
- If your dog guards the courtyard, then position the booth so that lying in it, the dog can see the gate and most of the yard;
- The structure should be located near the entrance, preferably on the south side;
- There should be a shaded area within reach of the dog so that he can hide there in the summer heat;
- It is important that the structure is not flooded in the autumn and spring, place the booth on a hill, if not, then make an embankment on your own.

Step by step description of the workflow
Now let's figure out how to organize the work and what you need to have on hand. I will talk about a simple option that can be implemented in just an hour if you have experience, and in a couple of hours if you are a beginner and do everything slowly. Let's start with the preparatory measures, since without them it is unlikely that it will be possible to cope with the work.
Gathering everything you need to work
First you need to collect all the materials, we will use this set:
| Beam 50x50 | We will use pine elements, they are easy to find, and they cost a little. The strength of the bar is suitable for us (it will withstand all loads without problems), and its dimensions, because we will use a 50 mm thick insulation, you can use a 10 mm layer on the floor, so you can buy a 100x50 bar, or you can connect two elements. Choose dry material and be sure that the bars are even and do not have pockets of mold |
| clapboard | This material will be used for outdoor, you can use the remnants of the material left over from finishing the house or other buildings, both a block house and an imitation of a bar will do. You can use any wood finish you have on hand. For interior decoration lining is also suitable |
| floor board | Most often, 1-2 pieces are enough, I advise you to use it because it is durable and there are grooves on the joints that ensure a perfect fit of the elements. Ordinary edged board will not fit as well, and you will have to additionally insulate the gaps |
| Plywood | This material can be used for the interior lining of the booth, it can also be used for the floor (in this case, the thickness should be such that it can easily support the weight of the dog). You can do without plywood, it all depends on what is at hand and what is easier to purchase |
| Styrofoam | We will use elements with a thickness of 50 mm, if you want to achieve the best insulation, then it is better to purchase extruded polystyrene foam, it is much denser and has higher thermal insulation performance. In addition, this material is more durable. |
| waterproofing material | If you have leftovers from construction, then you can use them, and if not, then buy a roll of glassine, its price is low, and the material is well suited for our purposes |
| roofing material | Here you can use what is at hand - from roofing material or glass isol to metal tiles, corrugated board, soft tiles, etc. The size of the structure is small, so choose the option that will be most convenient in your case. |
| fasteners | To assemble the structure, you can use nails or self-tapping screws, I prefer the second option due to greater reliability. To strengthen the frame, it is advisable to add metal corners, they will make it much stronger and more reliable. |
Remember that dogs have a very delicate sense of smell, so treatment with various chemicals from fungus and pests can have an irritating effect on the pet. In extreme cases, you can cover the outer parts with the composition, but not the inner ones.

When carrying out work, you can not do without a tool, we need the following set:
- To cut materials, you can use either a conventional hand saw or a power tool: a jigsaw, reciprocating or circular saw, etc. In principle, there is not much work and you can get by with a hacksaw, among other things, it also cuts the insulation well;

- To tighten the screws, you will need a screwdriver, and if you use nails, then a hammer is enough. If you will be using self-tapping screws, then make sure you have the right type and size of nozzles;
- All measurements are made using a tape measure or a metal ruler; any suitable pencil can be used for marking. To make perfectly even ends, it is best to use a carpenter's square.

When preparing, I strongly advise you to draw a sketch of the future design or find a ready-made version on the Internet. Believe me, if you clearly represent the final result and know all the design features of your booth, then in the process of work there will be no unnecessary questions, and you will not think what to do next, because there is a ready-made plan before your eyes.

Construction construction
To begin with, I will show you a diagram so that you understand the sequence of work, and then I will tell you in detail about each of the stages, everything is quite simple and you do not need to be a professional builder to master this process:
- First you need to make the frame of the lower part, it can be assembled either from a 50x50 mm bar, or from a 100x50 mm bar, it all depends on what temperatures are in your region in winter. The second option seems to me more solid, so I chose it, the structure is connected with self-tapping screws from 7 to 8 cm long or nails 100 mm long, jumpers are laid to increase strength, which are fastened in the same way;

- Then the flooring is nailed to the upper part, it is important to fix the elements as firmly and reliably as possible.. After that, the structure is turned over, glassine is laid on it from the inside, after which pieces of polystyrene are cut out and laid in the cavities, the remaining gaps are filled with mounting foam, it will serve both as a heater and as glue. Then another layer of glassine is laid outside, and the surface is covered with clapboard or;
From below, you can additionally attach two longitudinal bars or separate supports so that the structure is not located on the ground and is not saturated with moisture. This simple addition increases the life of the booth by at least one and a half times.

- Vertical racks are exposed, if your roof is gable, then they should be the same size, and if single-pitched, then one side should be higher than the other, the angle should be at least 15 degrees. Racks are best strengthened using a metal corner, which allows you to quickly assemble a very strong frame, it is important to set all the elements evenly so that the booth is neat;
- The frame is reinforced with crossbars at the top and in the middle, and the end parts should be made as separate shields that can be fastened securely and quickly. As a result, you should get a design similar to the one shown in the diagram below, there are no special requirements, the configuration may differ, the main thing is to strengthen the location of the manhole with bars on both sides, so that later you do not have to redo the frame;

- Next, you need to sheathe the inner surface of the walls of the booth, for this a lining is cut or pieces are cut out of plywood of the required size. When attaching, try to position the heads of self-tapping screws or nails so that they do not protrude above the surface, as the dog can get hurt on such elements if they stick out. Try to do everything as carefully as possible so that all the details fit together as best as possible;
So that the dog does not drive splinters, I always grind the surface of the lining or boards before sheathing the inner surface, this is a very important aspect that should never be forgotten.
- Then a heater is laid in the frame, I used polystyrene, but if you suddenly have mineral wool left after work, then it will do. It is important that the material does not emit small particles that can disturb the dog's sense of smell, glass wool is not suitable for this purpose. The entire space is filled with insulation, after which the joints can be blown out with mounting foam, and the surface can be covered with waterproofing material;

- After that, the outer part is sheathed, it is best to use lining for work, it looks great and has good thermal insulation performance. After finishing, all the cracks are again sealed with mounting foam, you should get a kind of sandwich panel like the one shown in the photo below. This design will perfectly protect the pet in the winter;

- Since I'm looking at a lean-to roof option, the top-opening design will become great solution. It will allow you to check what is happening inside, especially if the pet is sick and does not go outside for a long time. The hinged part can be attached to two door hinges, while in order for the joint to be reliable, pieces of felt or non-woven material can be stuffed around the perimeter;

- Then, insulation is laid between the bars of the roof frame, after which the surface is covered with waterproofing material and sewn up with plywood or board. Further, a crate is stuffed on top and roofing material is attached, if you buy it, then the easiest way is to order a piece of corrugated board of the required size. It must be screwed with special roofing screws;
- Lastly, the outer part is painted or coated with a weatherproof impregnation or varnish.. This will protect the wood from moisture and make your booth more attractive. After the composition dries, you can put the structure in place and populate your pet in it.

As for operation, you can put a litter inside, there can be many options: from a cover sewn to size, in which foam rubber or non-woven material is placed, to finished products that are sold in stores. In especially cold periods, you can put straw in the booth.
For the winter period, you can nail a curtain made of dense material over the manhole, it will protect the opening from the penetration of cold.

Conclusion
I hope that this simple instruction will help you build a warm and comfortable booth for your four-legged friend. The video in this article will clearly show some points of the workflow and help you understand the topic even better. If you have any questions, then write them in the comments below the review.
September 7, 2016If you want to express gratitude, add a clarification or objection, ask the author something - add a comment or say thanks!