Weaving tatting from thin wire. Oriental hobbies
Do you love lace? Probably everyone loves them. After all, you can decorate with lace not only dresses and blouses, but also any textiles for the home - it's so elegant and cute. Today we want to introduce you to the tatting technique - the process of creating lace from threads using the original technique.
If we talk about processes, then tatting knitting combines techniques different types needlework: here you have a hook, and knitting needles, and macrame, but at the same time it is something very special. However, let's take a closer look at the technique - everything will become clear to you right away.
Required Tools
Tatting weaving, like any other needlework, requires special tools and fixtures.
The main device for tatting is a shuttle. Shuttles can be of different designs, but they have the same essence - to make it easier for you to work with long threads. Inside the shuttle there is an ordinary bobbin, on which threads are wound (as in a sewing machine). For thin threads, small shuttles are used, and for thick threads, larger ones.

Another, equally important device is a hook and a needle. For tatting, special hooks and needles are used. The tatting hook resembles a Tunisian crochet hook, with a rather long, rounded handle and a small head. A tatting needle is very long compared to a regular needle (about 13 cm), evenly thick along its entire length, like a hosiery needle, and, moreover, blunt. You don't have to buy both a needle and a hook - just one tool is enough, depending on what you like best (or what seems more convenient).
In addition, you will need good scissors and a regular darning needle to fix the blemishes.
What to weave lace?
Tatting for beginners can seem a little complicated, so the choice of threads must be approached very meticulously. In principle, any thin crochet thread is suitable for lace - such as crochet or iris. But quality is paramount. Choose threads without thickening, soft, not too slippery. Cotton iris is ideal. To notice all your mistakes, choose light-colored yarn, on which all the reliefs are more noticeable.
Basic tricks
Regardless of whether you prefer tatting with a crochet or a needle, there are only a few weaving techniques. Here are their names:
- arc;
- ring;
- pico.
Everything else is a combination of these elements.
The basis of technology is one, just one node. Okay, two knots. One of them is the main knot with which any elements are woven, and the second is a connecting knot for two thread cuts.
The main tatting knot is called the double knot. Let's explore it right now.
Take a needle or hook. Insert a thread into the needle, and if you have a hook, prepare a shuttle with wound threads.
Press the end of the thread against the tool, placing the thread behind it.
Throw the long end of the thread over your index finger, twist it in the manner of a loop and throw it over the tool. Now put the thread on the index finger again, twist the loop in the other direction and put it on the tool again. Everything. You have mastered the double tatting knot.

Cuts of threads along the length are connected by the so-called Heracles knot, which you can also easily learn how to do.

Try to tie. Happened? Now you have mastered the auxiliary tatting knot.
First try
Well, let's go back to the double knot that you have on the needle or on the hook. Try to make a few more of these knots, placing them one after the other. You get a whole series of knots.
Let's start studying the elements of the tatting technique with a hook and a needle. The first element we will study is called pico. To do this, place the next double knot some distance from your row of stitches. Between the knots turned out to be a long constriction. Now move the knot to the row of knots. It turned out a protruding loop - pico.


Try knitting a small pattern by alternating rows of smooth double stitches and picot.
Now let's learn a new trick. It is slightly different in execution on a hook and on a needle, although its essence remains the same. You need to reset the resulting pattern and fix it.
In the technique of tatting with a needle, do this: hold the needle with one hand, and tighten the loops to its eye with the other. The loops will slip off and the needles will slip on the thread. Keep pulling, keep pulling. There is a small loop left at the end. Insert a needle into it, tighten. Here you have a ring!


If you started crocheting tatting, yours will be a little different. Thread the little finger, cover the head of the hook with it. Pull the thread gently through the knitted pattern. Now you have a loop with an ornament on your hook. Throw another loop on the hook, grab the working thread and tighten the ring.
The tatting technique for beginner needlewomen may seem difficult, not like other types of elegant weaving. And this is no accident, because it is impossible to stop being surprised at how airy masterpieces are created with the help of knots.
Base
In order to master tatting for beginner craftswomen, it will not take much time. The main thing you should pay attention to is the materials, technique and the ability to correctly read the diagram.
So, in order to start your acquaintance with this needlework technique, you need to look into the appropriate store and purchase the following items.
- A special thread that is used to create masterpieces in the technique of crochet or quilting. The thickness of the thread itself depends on the project, which will serve as an example for teaching. But their basis is more based on needlewomen. And in this case, both natural (cotton, linen or woolen) and synthetic (for example, nylon) can be successfully used;
- A special shuttle or a needle - you can purchase both to understand which of the techniques of this type of needlework will appeal to you;
- Scissors for needlework or regular manicure.
Here is the whole list necessary materials, which will be required in order to begin your acquaintance with this unusual and attractive type of needlework.

Tatting technique
It is worth pointing out right away that this species lace, unlike many others, assumes that the craftswoman herself will choose the most suitable tool for the job. So, there are only two main techniques: tatting with a needle and tatting with a shuttle. But it’s still worth starting with the most common - the shuttle.
Shuttle
You should start working with the shuttle as follows. A thread should be threaded into it, which, at a distance of 6 cm from the end, is captured with the index and thumb. Next, 4 fingers are wrapped around the thread from the shuttle, except for the thumb, so that it “returns” again to the already clamped end. After that, the thread from the shuttle (it is also the leading one) goes beyond the inside of the formed loop, wrapping it around. This is the beginning of the work. It is worth noting that basically the shuttle in tatting is held in right hand, and the left one acts as a "loom" for lace.
It is worth noting that in a tatting created using a shuttle, there are two basic elements: a direct and a reverse knot. Both of them make up halves, with the help of which an already full-fledged openwork knot is created.

Very often weaving lace with a needle can resemble knitting with one knitting needle. Partly it is. In order to start her work with a needle, a beginner needlewoman must cut the thread of the required length. It is threaded into the ear and a circle is formed from the larger part so that the tip is at the level of the needle point. Next, the needle is wrapped around the thread twice, after which, holding the semicircle of the opposite hand, a loop is formed, bending around and pulling the semicircle with a needle. By the way, in tatting performed with a needle, other basic elements are more often used, such as a pico and a double knot.
Reading diagrams correctly
Tatting for beginner needlewomen is difficult because they cannot always read the diagram, despite the fact that they have mastered the technique to perfection.
Mostly made in the form of peculiar colors from arcs, dots (otherwise called pico) and circles. In order not to get confused in them, for the first experiments it is better to choose those in which serial numbers are placed, as well as those in which there are abbreviations, for example: ds - double knot, ch - arc and others.
This is what constitutes the basis of tatting for beginners. It is worth trying to perform it at least once in order to make sure that this technique is really simple, but at the same time uniquely beautiful.
Openwork lace tatting
The word "tatting" refers to lace woven with knots.
Most researchers believe that this technique first appeared in the countries of the East. And special shuttles served as tools for weaving. Today, in addition to shuttle weaving, you can knit tatting crochet or with a needle.Tatting in European and Russian culture
There are many names for this lace: occhi for the Spaniards, tatting for the British, Schiffchenspitze for the Germans. The French term frivilite settled in Russian, which has two meanings. The word "frivole" can indicate both the perforated, airy structure of lace, and the "frivolity" of needlework, which was popular in high society.
 Beautiful lace earrings
In Europe of the 17th century, tatting was used for interior decoration (curtains, curtains, furniture covers), as well as for outerwear. The threads were thick and coarse, sometimes lace was woven from a thin cord. By the beginning of the 18th century, this weaving was increasingly found on clothes, not only for women, but also for men. Tatting made of silver and gold threads adorned collars and cuffs, jabots and aprons, skirts and caps.
Tatting in the interior


In the middle of the century, thin threads of silk and linen appeared, which made lace even more versatile.Russian craftswomen of the 18th century not only successfully copied foreign weaving techniques, but also supplemented it with their own unique motifs. Lace could be found on gloves, capes, handbags and many other items of ladies' toiletry. Of course, only people from the upper strata of society could afford such things.
Tatting clothing decor


Needlework, including embroidery and lace weaving, were considered indispensable skills for every woman, as evidenced by fiction times of L. N. Tolstoy. Girls were taught this from childhood both at home and in educational institutions. Lace weaving did not require too much concentration of attention, so it was easy to do it at secular evenings, having casual conversations.
Materials and tools for knitting lace
Everything you need for crocheting tatting can be found in a regular needlework store and fit in a small cosmetic bag, which, if desired, can be carried with you everywhere.So, for work you will need:
- Knitting hooks. Their size and thickness depends on the diameter of the threads. For weaving lace, you will also need thin hooks, if possible, you should purchase a small set of such hooks. The handles should be long and round, and the heads should be thinner than the handles. Knitting with such tools will be most convenient. It is possible to use wooden hooks, the head size of which can be slightly reduced with sandpaper.
- Threads. The thickness of the threads can be different, depending on what kind of lace you want to get. Beginning craftsmen are advised to choose thicker threads (for example, threads of the “iris” type), it will be easier to understand the principle of work with them.
- However, classic tatting is knitted with very thin threads (simple sewing). For such work, you will need to be patient and knit very carefully, but the result is worth it. In any case, the main requirements for threads are smoothness and the ability to easily tie knots.
- Also, you will need scissors.


Basic techniques for creating tatting patterns
Crochet and needle work can be combined.One of the most important elements of the basic technique is the double loop. Let's take a closer look at this part. knitting:
 Having mastered several tricks, you can create original masterpieces
- Having tied a sliding knot, we put it on the working end of the hook.
- We put the thread on the finger, its position should resemble ordinary crochet.
- Then the end of the thread, which is behind the finger, needs to be wrapped around the hook.
- We discard the thread from the finger. Thus, the first part of the knot is ready.
- Throwing the thread again, bend the finger slightly and wind the hook behind the back side.
- We drop the thread again and move both loops together. The double loop is ready.
Important: The whole variety of lace weaving motifs comes down to a few basic elements, such as an arc and a ring. After mastering them, it will not be difficult to understand any schemes and you will be able to create unique patterns yourself.
Tie a double knot
The second element, which is very often contained scheme - a ring. To avoid errors when connecting a row, you must follow the following sequence of actions:
- We hook the working thread with the little finger.
- Having intercepted the thread with a hook, carefully draw it through all the loops (and yarns) on the hook.
- We throw a loop from the little finger to the working end of the hook.
- We tighten the loop that was removed.
- Then we form a loop from the leading thread on the hook, draw it through 2 loops that were already on the hook. The ring is ready.
 Often when weaving, a ring pattern is used.
Pico is performed with a small space (stretch) before the next element.
Weave rings tatting
Tatting patterns with a detailed description of the work
In the technique of tatting perform a large number of products, from small earrings, pendants and necklaces, to large napkins, tablecloths, etc. In addition, lace inserts of various sizes adorn clothes.
Consider schemes the most popular motifs. One of the most elegant details is the tatting butterfly.A pair of these butterflies can be beautiful earrings.
- For the first ring, we make 6 double loops according to the scheme described above. Then we alternate: picot, double loop, picot, double loop, picot and again double loop. We finish with six double loops and close the ring.
- The second ring will be like this: 4 double loops, pico, again 4 double loops. Close the ring.
- Knit the third ring in the same way as the second.
- The fourth is knitted like the first.
- We connect the rings in the form of a butterfly according to the scheme.
Weaving pattern - butterfly
Next simple knitting pattern crochet for beginners - flower. Rings for him are knitted as follows:
- First - we knit 4 times 3 double loops, separating them with three picots.
- The next three rings are knitted the same way. It also knits 4 pieces of 3 double loops, separated by three picot. The difference is that the first pico is connecting.
Advice: In order to connect the elements using picot, you need to follow a few simple steps. Holding the attached ring, we draw the hook into the picot, grab the thread and pull it out.
Then fill the ring according to the instructions above.On graphics scheme tatting usually conditionally depict the basic elements of the pattern - an arc, a ring, a pico and some others.
 Crochet Pattern - Flower
Under the image you can find a transcript explaining the sequence of work and the number of knots required for a particular element.The order of knitting is indicated by Arabic numerals. For convenience, knitting elements are indicated by abbreviations in the first letters: k - ring, p - pico, d - arc. And the number of nodules in the element is usually indicated by a number in brackets.
Tatting with beads and beads
Lace with beads and beads are quite common. This is especially true for knitting all kinds of "jewelry" products - earrings, pendants, pendants. Beginning masters are recommended to study video master classes, and only after that start experimenting.
 jewelry from beads will be a wonderful gift for any girl
The easiest way to work with solid beads. Schemes with beads different color will be more difficult. You will have to string the beads on the thread in advance, and after that you will gradually weave them into the pattern. Therefore, it is worth remembering the order of stringing - it must be reversed, the last strung bead will be used first. It is easiest to weave beads where pico is knitted. You can also move the beads towards the loop that forms the ring. Be sure to do this before you start knitting knots.
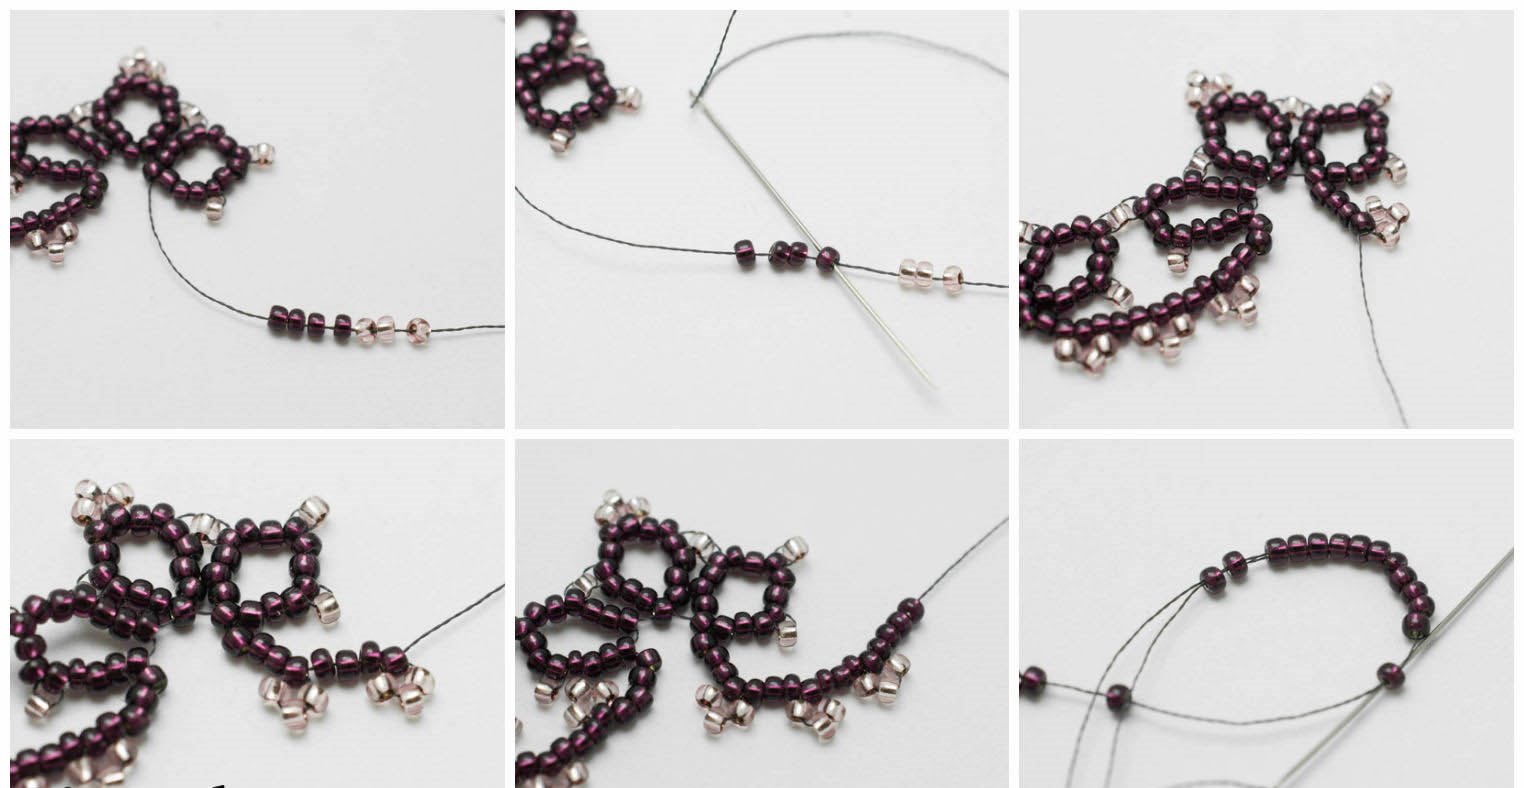
Working with larger beads is slightly different. They are rarely woven together with pico. The most elegant and most common option is a bead in the center of the ring. To do this, the ring is knitted in two stages. The first half is knitted as usual, then the picot is added (it should be slightly larger than the diameter of the bead), and after that the second half of the ring is finished. The bead is strung with a hook and moved onto the pico thread. The thread is hooked using an additional needle. The needle is passed through the bead, picking up the working thread, then the thread is pulled out of the picot. Beads with a diameter larger than the ring can also be used, given that they will be on one side of the weave.
The combination of tatting and crochet
Combining tatting with other types of needlework gives very interesting results. The tatting technique with one crochet, in contrast to shuttle weaving, is limited mainly to round elements (rings). Therefore, learning to combine weaving with ordinary knitting will be very useful.
 Crochet lace tatting creates fabulous decorations
Some of the most successful ideas for combining knitting and crochet in one pattern:
- With the help of chains of air loops and ordinary columns, you can add straight sections, and also connect the rings to each other. In the same way, you can break the pattern into parts.
- It looks interesting to tie half rings and rings with single crochets, connecting them with a picot.
- Chains of air loops can form a grid that fills the space between the main elements of the motif. Crochet pattern can be mastered even by a beginner
Let's analyze one of the simple and effective knitting patterns for a lace motif for a napkin. The first and third rings are knitted as follows: 5 double loops, picot, 3 double loops, picot, 3 double loops, picot, 5 double loops. Second ring - (arc) 5 double loops, pico, 5 double loops. Fourth - (arc) 5 double loops. We connect the required number of motifs with a hook to each other.
Crochet pattern
Tatting is a simple and exciting technique available to everyone. Lace does not go out of fashion, but their creation will require patience and perseverance.
 Luxurious example of a tatting item
What to do with yourself in your free time? You can get carried away with something familiar, or you can discover something new. Like, for example, tatting. Schemes and descriptions of work will help and clearly show what can happen in the end.
Types of needlework
The word "handicraft" means "to make with hands". Can be made from different material: from fabric, thread, natural materials, paper, glass ... The same applies to the way the work is done: you can glue, knit, embroider, weave, burn ...
There are very popular activities, but there are not very popular ones, there are complex and simple, traditional and modern ... In any case, if you want to do something with your own hands, then from all this great variety of hobbies you can choose an activity to your liking. This article will talk about unusual hobby- frivolity.
Tatting
This is lace weaving with a shuttle. Came to Russia from France, so with French translated as "frivolity". Tatting was fashionable in the seventeenth century. Gloves, handbags, umbrellas, as well as curtains and napkins were then made using this technique. Some special lightness emanated from such things, and they were the property of every woman.
After the revolution, tatting was declared a lordly whim and undeservedly forgotten.
Today, against the background of hobbies of various kinds of needlework, they remembered tatting. It has become a type of hobby with which you can decorate things and give them individuality.
Making lace with a shuttle using the tatting technique is easy and very exciting. No special expensive equipment is required. Weaving is mastered very quickly, and the end result is so beautiful that you want to improve your skills again and again.
simple weaving
Tatting lace is made from just one knot, which alternates with broaches. They are called "picot" and are connected in circles and arcs. Various combinations of this duet form the pattern. If you master the execution of this knot when making lace using the tatting technique, it will be easier to read the patterns of patterns.
The knot is performed with a needle or a shuttle. Consider a needle.
The knotting of a double knot is performed as follows. We press the thread with a needle to the finger, leaving a small end. We take the working thread on the index finger, twist it and put it on the needle. Tighten the knot carefully. Again we take the working thread on the finger and twist it, as in the first case, only in the other direction. We throw it on the needle, pull it up, and the double knot is ready.

Now let's see how pico is made. First we will make five double knots as shown above, then we will leave a little free thread and make a double knot again. Now we pull it to the weave and get a pico. Its value will depend on the length of the free thread that we leave between the nodes.

We continue weaving further to this length: there should be three picots and four segments of five double knots on the needle. Let's make a ring, which is the main element of tatting lace. To do this, we thread a working thread into the eye of the needle, pull the weave onto it, stretch it to the end and make a ring.
Now let's see how these rings are connected to each other. We leave a little thread, approximately, as on a pico, and we knit five double knots. We connect them with the first picot on the ring made earlier, for this we draw the thread with a needle. And then we knit like the first ring.
Having learned how to make these simple elements, you can move on to more complex patterns that are performed using the shuttle.
There is another way of weaving - this is crochet tatting. Let's see how the flower is made. Instead of a needle, take a hook, it is very convenient for them to drag the thread into the finished circles.
The main element of the flower is a circle, the implementation of which is described a little higher. We will perform it from four double knots. When the first circle is ready, we make a connection: we collect four double knots, we knit the fourth and third together and we collect one more knot. The connection is ready. Then we carry out weaving in a similar way. In total, we will make six circles, connecting the first and last. You will get a wonderful flower.
It can be used as a separate craft, such as an earring. It can also be an element of a more complex weaving. For example, it can be seen in the center of the napkin shown in the first photo.
world tatting
Remarkable are things made in the technique of tatting. Photos of such products are proof of what beauty is obtained.
Such a decoration will be a great addition to the outfit and will further emphasize the individuality of its owner.
Lace in the technique of tatting, the schemes of which are presented in the article, can be an independent product and a decorative element of both a thing and a room. This diagram shows a lace element that can be used in any product.

An example of the first group can be hats, dresses, jackets, openwork traces, bookmarks for books.
Decorative potholders, napkins, tablecloths, birds and animals, vases, snowflakes are designed to decorate the room.
Collars, flowers on a dress, cuffs can be used as an element. The diagram clearly shows how you can make a collar using the tatting technique.

And, of course, you can make all kinds of jewelry in the form of earrings, rings, bracelets, necklaces, hair clips.
Tatting masters
The art of weaving lace using the tatting technique, the diagrams and photos of finished products are so fascinating that, having met them once, you return to this needlework every time, improving your skills.
For many needlewomen, this hobby has become a matter of life, and they willingly share their skills.
Such tatting masters as Elena Ignatova from Kharkov, Olga Meshkova from Abakan, Tatyana Romanovskaya from Odessa, Elmira Kukhtichenko from Donetsk are known in wide circles. Their works are so exclusive and magnificent that, looking at them, you just want to try your hand at weaving these circles. Many of them have their own websites where they share the secrets of craftsmanship or talk about new works. They are creative and offer non-standard design solutions, embodied in original products. They are regular participants in various exhibitions where you can buy their work.
And of course, it must be said about the world-famous Pole Jan Stavash, who did a lot to popularize tatting, he also dispelled the myth that needlework is not for men.
This is how this unusual type of needlework appeared before us.
The word "tatting" is borrowed from French. The Italians call this type of lace "occhi", i.e. "eyes" (compare with the Russian "eyes"), for its characteristic shape of eyes. There is another name: "shuttle lace" - according to the tool used to make it.

Tatting technology is based solely on knotting. The thread is fed from a small bobbin placed in the hook body and processed with both hands.

The right hand holds the shuttle and wraps it around the thread, which it pulls off the bobbin and holds it taut. left hand. As a result of processing only one thread, rows of knots are obtained, formed into circles and arches. From one part of the drawn thread, a rod arises, from the other, a braid of the rod, similar to buttonhole stitches, alternately front and back. Both parts together give a double loop knot.


In manuals for making tatting lace, it is simply referred to as the "double knot". A sign of tatting lace is a continuous, without gaps, connection of knots and the formation of some knots of arcs and a circle. The shuttle is used as a tool to simultaneously hold and feed the thread like bobbins when making bobbin lace.


Initially, the shuttles were larger and were used with a coarser thread than now. In the 18th century, when all types of lace began to be made from fine linen thread, shuttles became smaller and more elegant. Most often they were made of metal, and sometimes - of porcelain or ivory. Shuttles made of tortoise shell trimmed with metal or mother-of-pearl were also in use. Now such shuttles are most often made of bone or plastic.


The most suitable raw material for making tatting lace is twisted thread, as well as knotted yarn made from linen, cotton or silk. In addition to the shuttle, another auxiliary tool is used - a crochet hook, and sometimes a fairly thick sewing needle.


Each type of lace has its own history, its own way through the ages. Sometimes, it is visible clearly and distinctly, and, at other times, it is completely lost. Many references are very ambiguous, their interpretation, at times, is difficult due to the fact that they have to be translated many times. First, from the ancient language to the modern one, then to the languages of those countries where translations of books are published. Of course, this could have been avoided if those who undertook the research knew the original language. But this is not always possible. Therefore, one has to be content with translated editions.


Modern researchers come, sometimes, to completely unexpected conclusions. Everyone knows the great work of the ancient Greek blind poet Homer "Odyssey". One episode tells how Penelope, the wife of Odysseus, deceived her suitors for a long time. She promised to give an answer when she weaves a funeral blanket for her mother-in-law. The essence of the deception was that at night she dismissed her day job. However, it is very difficult to dissolve what has been done on a loom, it takes almost more time than a new weaving, in addition, noticeable traces remain. It is very likely that Penelope did not weave, but knitted a bedspread on the needles, since the knitted fabric can be easily and quickly unraveled without noticeable marks. And there are many such mistakes.


For the reasons stated above, little historical material has been preserved. With a high probability, it is possible to put forward the theory of the "eastern" origin of this lace. Since the shuttle was invented by the peoples of the East and was called "manuk". In Europe, it first appeared in Spain, where it was called occhi (okko, i.e. peephole), since Spanish shuttle-made guipure consisted mainly of oval-shaped rings resembling the shape of an eye. In Germany, this lace is called Schiffchenspitze (Schiffen Spitz) - shuttle weaving or shuttle lace.


In England, tatting (tetin from "tat" - to weave lace) - braided lace. The origin of the French word frivilite (tatting) is twofold. On the one hand: "frivole" - "empty" can be attributed to the structure of lace - loose, with large, unfilled holes, on the other hand, the same word can be translated as "frivolous", which, in turn, can be attributed either to the frivolity of any finish , or to the characteristics of ladies of high society who were engaged in needlework. Indeed, it was very popular in these circles, because. did not require much concentration and allowed for empty, frivolous conversations. One way or another, shuttle lace came to Russia from France, and therefore we call it "tatting".


Tatting was especially fashionable in the 17th century. Laces woven in this technique were made from materials that were coarser than other types of lace (even from a thin cord) and were used for finishing outerwear, sheathing furniture covers, curtains, and drapes.
At the end of the 17th and beginning of the 18th centuries, when it was especially fashionable to decorate clothes, even men's, with lace collars, cuffs, frills, lace trimmed skirts, aprons, caps, it was the privilege of the highest nobility. Since the main material for its manufacture at that time was a thin gold and silver thread. 

But already in the middle of the 18th century, silk and linen thread began to be introduced into lace, in connection with which, lace weaving is becoming more and more widespread. In Russian landlord estates, our craftswomen mastered the technique of weaving Western lace with interest, supplementing it with their own finds. Unknown lacemakers created unique products that were used by women of high society.


Gloves, handbags, capes, umbrellas - this is an incomplete list of products that were an obligatory accessory for a secular lady. Lace weaving was taught at home (the skill was passed from mother to daughter), and in pensions, and at the institutes of noble maidens. The ability to embroider, sew, knit, weave was one of the duties of a woman. Needlework was taken with them to evenings, on trips, let us recall at least Leo Tolstoy's novels "War and Peace", "Anna Karenina".


A very affordable master class on tatting with a needle, I hope the photos will allow you to learn this technique) (c)

Tatting lace is special. And this is where its uniqueness lies.
This lace is made up of about one node. In order to master the technique of weaving it is enough to learn how to weave
o d and n node.
double knot
The thread should be behind the needle.


The node is finished. This is the only knot in the tatting.
All the variety of patterns of this lace is based on a combination of three elements
*ringlet
*arc
* pico
Pico
Made one double knot

Knit 4 more knots for a total of 5 double knots. Knit the next knot, leaving a little free thread. This then forms a pico.

Pull the double knot close to the other knots. Now there are 5 double knots on the needle, pico, 1 double knot.

Tie 4 more double knots, pico, 5 double knots, pico, 5 double knots.
Pico is a loop between nodes

Making a ring
To make a ring:
hold the needle with your right hand, and with your left hand pull the knots from the needle towards the eye

Continue pulling knots down the thread

Keep tightening. allowing the ring to form between your fingers.

This is a finished closed ring. The tighter you tighten it, the smaller it will be, but you only need to pull the long part

Ring connection
Tie 5 double knots.
For connection (+), start the thread at work 
pull the needle and thread through the picot of the previous ring with the tip of the needle

Pull the thread as shown in the photo

Then, tie 5 double knots, pico, 5 double knots, pico, 5 double knots on the needle. close the ring, removing the connected from the needle. The two rings are now connected. The connected rings share a picot.
The connection is always made only in this way. 
Finished result

Adding a new thread and masking the ends
If you run out of thread, cut a new piece from the ball. Pull into the needle and pull the needle through the last double knot. keep pulling until there is a tail a few cm long. 
Tie a knot next to the double knot. 
Leave some yarn loose and knit on.

To hide the end, you need to tighten the thread into the needle and stretch the needle inside 2-4 double knots

Making a ring with a thread from a ball
We collect not a needle:
2 doors, pico, 2 doors knot, pico, 2 double knots, pico, 2 doors node, pico, 2 double nodes, pico, 2 double nodes

The needle should look like this. 
Holding the double knots, carefully slip them off the needle, leaving a small loop at the end.

Pull the needle through the loop. continuing to pull, forming a ring.

finished ring

To flip the ring, turn it reverse side like the page of a book.

After you turn the ring, the threads will cross. forming a loop

Pull the needle through the loop and tighten the knot

finished ring
Making a chain
Put the needle on the newly made knot

We knit 3 double knots, pico, 3 double knots, pico, 3 double knots, pico, 3 double knots per needle. Leave no space between the first knot and the ring.

Remove the knots from the needle, and continue to pull until the very ring. The chain is over

Return work. Turn it upside down, as if turning the page of a book. A loop is formed.

Pull the needle through the loop with the end up.
The only difference between a ring and a chain is that for a ring we pull the needle and thread up through the ring, and for a chain we pull the thread until the loop disappears. 
We make 2 double knots, pico, 2 double knots, + (to the penultimate pico of the previous ring), 2 two knots, pico, 2 two knots, pico, 2 two knots, pico, 2 two knots on the needle

Close the ring, but remember to pass the needle through the ring 
Pull the knot tight

Turn the work (wrong side up) and tighten the knot

Second chain.
Work with needle 3-3-3-3. Pull the thread through the chain and turn the work.
Be sure to tie a knot after each ring or chain.

ring 2-2+(to the penultimate pico of the previous ring) 2-2+(to the second pico of the first ring made) 2-2, close, turn


Work chain 3-3-3-3, turn. Tighten knot

Finished medallion

New thread and two-tone tatting
New thread
A new thread can only be added at the end of a ring or chain. After the ring is better. 


two-tone tatting


ANKARS - the technique of weaving beads into lace. 


Ring connection


(c) source
Very often, when weaving products using the tatting technique, closed motives, each of which is woven separately and connected to the others with the help of a picot. There are a great many such motives, different in size, shape and complexity of execution. If you decide to weave a product completely from individual motifs, then first weave several different samples, cut out templates from paper according to the shape and size of these motifs, lay out the templates on the product pattern. Thus, you can accurately calculate all the nuances of the upcoming work.
square motif
A simple square motif, woven in one row.
1.7 - K (6p4p2p4p6)
2.6 - D (4p4)
3,4,5 - K (5p4p2p2p4p5)
8 - D (6p3p3p6)


Four-point motif
This four-pointed motif is weaved very simply - without separation in one row.
All rings - (3p3p3p3p3p3p3)
All arcs - (3p3p3p3)


Hexagonal snowflake motif
This motif is woven in one row. The motif is woven with threads of different colors.
1 K (3p3p3p3p3p3p3p3)
2. K (3p3p3p3p3p3p3p3p3p3)
3. K (3p3p3p3p3p3p3p3)
4. D (2p11)
5. K (5p5p3p5p5)
6. D (11p2)


Motif "eight-pointed snowflake"
A closed motif is woven in two rows. The first row consists of one element - ring No. 1.
1. K (3p3p3p3p3p3p3p3p3)
2.6K (3p3p3p3p3p3p3p3)
3.5 D (3p3p3)
4. K (3p3p3p3p3p3)


Hexagonal tatting motif
1 - Ring (8p5p3)
2 - Ring (3p5p1p1p5p3)
3 - Ring (3p5p8)
4 - Ring (4p4p4)
5 - Ring (4p4p1p1p4p4) 

Tatting square motif 1
1 - K (3p3p3p3p3p3p3p3p3p3)
2 and 10 - Arc (5p5)
3, 5, 7 and 9 - Rings (5p5)
11 and 13 - Arcs (7)
12 - ring (5p5)

Tatting square motif 2
This is a variant of the previous motive
1 - K (3p3p3p3p3p3p3p3p3p3)
2 and 10 - Arc (5p5)
3, 5, 7 and 9 - Rings (5p5)
4, 6 and 8 - Arcs with decorative picots (2p2p2p2p2)
11 - Arc (7p7) 
Bookmark for a book- a small elegant little thing, for which the tatting technique is just perfect. A strip of openwork flat lace looks great and is easy to make. If you are just learning the art of nodular lace weaving - then bookmark, this is the product you should start with. 
1 Arc - 2p3p3
2 and 4 - Rings - 3p2p2p2p2p2p3
3 Ring - 3p2p2p2p2p2p2p3
5 Arc - 3p3p3p3p5pp3
6 Arc - 3p3
7 Ring - 3p3p3p3
8 Arc - 4 double tatting knots
9 Ring - 4p2p2p2p2p2p3
10 Ring - 3p2p2p2p2p2p2p3
11 Ring - 3p2p2p2p2p2p4
Next, weave observing symmetry

According to this scheme, you can weave bookmarks from threads of two colors


(With)
New Year Lace Mask
The mask is woven in three steps. First, two identical eyeliners, connected together with only one picot, and then a common lace frame, decorated with decorative picots. Instead of decorative pico, you can weave beads. The scheme of work is an alternating simple : rings and arcs.
First row (2 pcs)
1 - ring (5p5p5p5)
2 - arches (6)
3, 5 and all other rings of the first row - (4p5p5p4)
4, 6, 7, 8. 9 - arc (7)
10 - arc (4)
11 and 12 - arc (3)
13 - arc (5)
14 - arc (7)
15 - arc (6)
16, 17, 18 - arc (7)
19, 21 - arc (5)
20 - arc (4)
22 - arc (5)
23 - arc (8)
24 and 25 - arc (3)

Second row
1, 3, - ring (6p6)
2.8 - arc (4p2p2p4)
4 and 6 - ring (5p5)
5, 11 - arc (3p2p2p3)
7, 9, 10, 12 - ring (6p6)
13 - ring (5p5)
14, 17, 20 - arc (5p2p2p5)
15, 16, 18, 19, 21, 22 - ring (5p5)
23, 26 - arc (4p2p2p4)
24, 25 - ring (5p5)
27, 29 - ring (5p5)
28 - ring (5p4p5)
30 and 32 - ring (4p4)
31 - ring (4p2p2p4)
33, 36, 39, 42, 45 - arc (3p2p2p3)
34, 35, 37 - ring (4p4)
38, 40, 41, 43, 44, 46 - ring (5p5)
47, 49, 50, 52, 53 - ring (6p6)
48, 51, 54 - arc (4p2p2p4)
55 - ring (7p7)
56 - arc (5p2p2p5)
57 - ring (10p10)
58 - arc (4p2p3)
59 and 61 - ring (3p3p3p3)
60 - ring (3p3p2p2p3p3)
62 - arc (3p2p4)
63 - ring (8p8)
64 and 66 - ring (7p7)
65, 68 - arc (5p2p2p5)
69 - ring (6p6)