How to cut a heart on a board. DIY decorative wooden hearts
An extra entourage will help make dinner romantic on Valentine's Day. In addition to flowers and candles, you can decorate the room with original, hand-made souvenirs. They resemble heart-shaped Christmas decorations, and later you can use them in this capacity.
materials
To make decorative wooden hearts with your own hands, you will need to prepare:
- polished wooden figurines of hearts;
- small self-tapping screws with a loop;
- paint of red and pink shades;
- pink and red ribbons.

Step 1. Take wooden hearts and screw the screws in the middle of their upper part. Screw them in until one loop remains in the center of the figure.

Step 2. Decide on a place where you will hang decorative hearts. Measure the mounting height. The resulting figure, multiplied by two, is the length of the piece of tape that you will need to cut to attach the heart. You can take the ribbon a little with a margin to tie it not just in a knot, but in the form of a beautiful bow. Pass the tape through the ring of the self-tapping screw and tie it.

Step 3. Get your paint cans ready. Mix the paint thoroughly. Take the heart by the ribbon and dip it into the paint, leaving a small piece of wood unpainted. Let this coat of paint dry thoroughly.


Step 4. Repeat the manipulation with the paint of a different color, lowering the heart into it so that the area with the already applied paint remains unpainted.
Valentine's Day is approaching, the celebration of which invariably takes place in a romantic atmosphere. Most effective method create it - decorate your own home with cute decor, symbolizing the strong feelings of lovers. We share simple but spectacular decor ideas for the most sensual holiday of the year.
Personal book of love
It is not difficult to make such decor. You will need ribbons, white and red paper, several hardcover books. Wrap them in red paper, glue hearts with inscriptions on the cover. It remains only to fold the books in a pile and tie with a ribbon.
It is advisable to stop the choice on books, the subject of which corresponds to the holiday. Take romance novels, for example. After all, the partner may have a desire to flip through the book.
A more difficult option is to make personal love books. Take several photo albums, in each of which leave the required number of pages. The rest can be carefully cut off. Fill your photo albums with pictures you've taken together and other memorabilia like letters.
A tree that grows words of love
To make such a decor, you will need several fancy-shaped branches and colored paper. Place the branch in a vase and hang paper-cut hearts with thematic inscriptions on it. For example, you can write declarations of love on them or the best qualities of a loved one that delight. If desired, the branch can be covered with white, pink or red paint from an aerosol can.
Unusual contrast postcard
Valentine's Day is impossible to imagine without the exchange of "valentines". A hand-made postcard will show the power of feelings much better than a store-bought one. Fold a sheet of thick paper in half. Outline the contours of the heart on it and draw stripes. Fill in the outlines of the stripes with black paint and fill in the hearts with small red buttons glued on with acrylic or silicone glue.
A picture instead of a thousand words
Surely the house has a lot of assorted buttons that are not worthy of use. They can be used to create a romantic picture. With threads or chalk, mark a contour on the fabric according to the size of the selected frame. Try several options for the location of the buttons inside the outline and choose the one that you like the most. It remains to sew the buttons to the fabric and cut it so that it is slightly larger than the frame. This is necessary to securely fix our picture in the frame.
Romantic garland of countless hearts
Even a child can make such a garland, but it looks more than spectacular. Fold thin strips of multi-colored paper in half and bend in the middle. Fasten the free edges of the strips with a stapler or simply glue them together. The first heart is ready. Then thread a couple more strips through it and repeat the described procedure. It remains only to be patient and collect a garland of the desired length.
Another option is to make a large heart, consisting of several small ones. The edges of narrow strips of paper folded together, glue together. The two strips in the middle remain free. The free edges of the remaining strips are glued to this middle on both sides.
Love with coffee aroma
Ordinary candles in red and white colors are a good, but a little boring version of the decor for Valentine's Day. We offer to diversify it - to make a candlestick with your own hands, which will exude a pleasant coffee aroma. Just fill a low glass container with coffee beans and place a flat candle in it.
Souvenirs for friends from the heart
The basis for the manufacture of such a decor, which can be used as a souvenir to friends or to decorate the house, are hearts made of multi-colored cardboard. In order for the threads to be held in the picture in the desired position, it is necessary to cut its edges in the form of a zigzag. Tie the first turn of thread on the base heart. Use the free long edge to wrap the heart in a circle. In this case, the thread connects the opposite cutouts along the edges of the postcard.
Garland of pleasant memories
Most photographs, no matter how important they are, are rarely reviewed. So why not make Valentine's Day an occasion for fond memories of moments spent with your loved one? Fasten the printed photos with a decorative clothespin on a long ribbon and decorate with hearts cut out of paper. If there are no clothespins, glue the pictures with any universal glue.
DIY love elixir
Ordinary Coca-Cola in glass bottles, decorated with your own hands, turns into a love elixir. Remove labels from bottles, carefully clean paper residues. Then degrease the glass by wiping with alcohol - this is necessary so that the paint is securely fixed on the surface. Acrylic or stained glass paints are suitable for glass coating.
Cupid's arrows from which there is no escape
The basis for Cupid's arrows, which can be given to loved ones or used to decorate the interior, are wooden barbecue sticks or cocktail tubes. From a dense fabric, for example, felt, the arrowhead and feathers are cut out. Identical parts are glued together on the "pole", thereby being fixed on it.
Love message on bottles
Wine bottles will help convey a message to your loved one. Carefully clean them from labels, degrease the surface with alcohol and cover with acrylic paint. Special paints for glass, which are sold in needlework stores, are also suitable. When the painted surface dries, draw the desired letters on it. The decorative composition will be complemented by branches of artificial plants placed in bottles.
Heart to be eaten
Decor from fruits or vegetables - an original way to decorate festive table, Any oblong red or pink colored fruit will do. For example, cream tomatoes. Cut several vegetables in half diagonally, fasten the different halves with a decorated toothpick. Appetizing hearts are ready.
Heart filled to the brim with love
What will be required to make a decor that symbolizes a heart filled to the brim with love? Twist-top jars, gold-colored acrylic paint, bright ribbons, multi-colored beads. In order for the paint to adhere well to the glass surface, do not forget to clean it and degrease it with alcohol. Instead of beads, you can use any bright little things.
Decor for the sweet tooth
Decor for a festive table can be done in a matter of moments. Simply fill glass vases or tall glasses with colorful chocolates.
Cozy panel in country style
As the basis for the panel, you can use cardboard or a small board covered with fabric. The heart itself is made from short colored sticks. Draw the outline of a heart on the fabric and glue sticks on it with acrylic glue. Then you can start filling the contour. Three or four layers of sticks glued on top of each other are enough to create an exclusive home decor.
Simple but effective decoration for a festive dinner
Paper and scissors are all you need for a cute decoration that will brighten up your holiday table. Fold the paper several times, draw a heart on it and cut it out. The more hearts on the table, the more elegant it will look.
Symbol of love in quilling technique
A heart made of many pieces of paper rolled into a tube can be used as a hanging or table decor. Cut out a heart from thick cardboard. Glue thick paper tubes along its edges in a vertical position. For the reliability of the design, they can be glued together. Now you need to fill the heart with other paper tubes, but already loosely twisted. We recommend making them in different sizes - so the composition will look spectacular. Additionally, the heart can be decorated with ribbons or lace.
A love game that doesn't get boring
As the classic said, "our whole life is a game." So, love too. This attitude to the most beautiful feeling can be expressed by decorating the interior with a decorative garland. Heart cards act as its constituent elements. Holes are made in them with a hole punch, through which a thin red ribbon is threaded. Additionally, the garland can be decorated with narrow strips of fabric tied to a base ribbon.
Sparkling wreath of hearts

The basis for the manufacture of such a hanging decor is metal containers from “pills” candles. They are easy to bend into a heart shape. Then the elements of the garland are glued together with silicone or acrylic glue. It remains only to decorate the wreath with ribbons and hang it on the wall or on the door.
Newspaper panel with good news
Replace a framed picture or photo with a newspaper page. The inscription on it can be applied using a stencil with letters or drawn by hand.
Strawberry hearts in champagne
Hearts carved from strawberries will look especially impressive on low champagne glasses. We recommend opting for medium-ripe berries, otherwise the edible decor will not be firmly fixed on the glass.
Bright garland of voluminous hearts
A festive garland of paper hearts is an interior decor for Valentine's Day that will definitely not go unnoticed. From multi-colored paper, cut out hearts of the same size. Then put two hearts together and sew them down the middle. Make a hole in the upper part, and then bend the halves of the hearts. It remains only to thread the ribbons through the holes and tie them to the base.
Heart pieced together
A puzzle is a thing that quickly gets boring and is used quite rarely, but a hand does not rise to throw it away. But the old puzzle can be given new life. Just glue its parts together in the shape of a heart and decorate the resulting wreath with ribbons.
Romantic panel in string art technique
The basis for the decorative panel for Valentine's Day is a painted square board, into which nails are driven in along the drawn contour of the heart. A thread is tied to one of the nails, which then clings to the others in a chaotic manner. By the end of the work on the panel, the thread should wrap around each nail. The greater the distance between adjacent nails, the more thread layers the panel should have.
Unusual wreath made of wood
If you have a thick branch and a jigsaw at your disposal, then you should try to make an original wreath from wooden cuts. To make such a decor look elegant, we recommend making the saw cuts thin. From cardboard, cut out the contour of the heart 8-10 cm wide and stick the first layer of cuts on it. Then glue the second, so that the wooden saw cuts close the gaps between the elements of the first layer. To keep the texture of natural wood visible, paint it in light colors.
If the idea of sawing wood seems too complicated, then use hand-painted paper hearts instead of saw cuts.
To make a candlestick symbolizing a burning heart, you will need glass jars, newsprint or music paper, and decorative twine. To give the paper an aged look, you can moisten it with strong coffee or tea. After drying, the desired shapes are cut out of paper and glued to a jar tied with decorative twine. Similarly, using carved paper napkins, you can make other candlesticks.
"Heart" decor made of cardboard and threads
Wrap hearts a couple of centimeters wide, cut out of cardboard, with a thick thread. Tie the remaining free end into a loop. Such hearts are used as an independent hanging decor or elements for a garland.
Laconic panel with a textured paper heart
A cardboard box with voluminous sides was used as a frame for the panel. If one was not found, then thin wooden bars can be glued around the perimeter of the cardboard base. The heart, the central element of the decorative composition, is made of paper with notched edges. In order for the panel to look voluminous, several identical hearts bent in the middle are glued onto the cardboard base.
For wine connoisseurs
Preparing materials for such a decorative panel can take a lot of time - after all, you need to collect a couple of dozen wine corks. Then the corks are glued to a dense wooden or cardboard base using building glue. Gently color the corks in colors ranging from pale pink to dark fuchsia, creating a gradient effect. The panel can be supplemented with a thematic inscription.

A universal selection of gift ideas for every occasion and occasion. Surprise your friends and loved ones! ;)
Friends, hello everyone! Today I wanted some romance, a beautiful manifestation of feelings. And what if not hearts allow you to do it best? That is why I will tell you about how to make a heart with your own hands.
Hearts are generally my favorite theme - I often give them to family and friends. They are so versatile that they are suitable for literally any holiday, from the classics (February 14) to the exotic (Halloween, for example). If it weren’t for the time limit, then hundreds of these wonderful things would be churned out and flunked by all my friends))
The variety today will be terrible - from unusual paper ideas to mind-blowing fantasies from wire. For every taste and color, so to speak.
How to make a heart with your own hands: amazing ... simple
I have prepared for you as many as three dozen ideas, so there will be clearly plenty to choose from.
Balloon heart
You can make an amazing heart with your own hands if you prepare two long balls (from which different animals are still twisted), thick threads, scissors and silicate glue (you can try experimenting with other glues, the main thing is that they are transparent).
The process is simple: inflate the balloons, as in the photo and wrap them with threads soaked in glue. You can apply several layers to make the design more weighty. After the glue dries, the balls need to burst and get them out of the finished frame. The tubes then need to be glued together, slightly cutting one. All that remains is to hang.

paper heart
Gentleman
This is a two-in-one craft: you can make a designer box or leave it as a valentine. Probably, it can even be called an almost voluminous postcard due to the presence of an intermediate box between the two halves of hearts.
You will need cardboard or thick paper, scissors, glue, satin ribbon and decorative elements. Cut out all the details according to the photo and connect. If you want to make a box, then make it as well (numbers 6-7). Glue everything together.

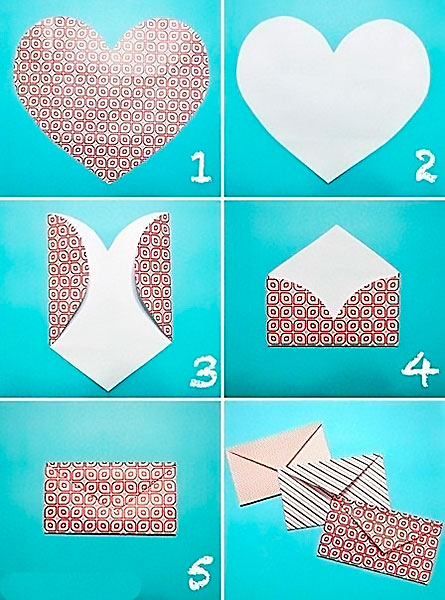
The envelope
A very simple idea. A heart shape is cut out of paper, in which the side, and then the lower edges are bent. The corner becomes a closing element. If the edges are loosely fastened, then on the heart itself you can write wishes in advance and only then fold.
Heartfall
To implement this decorative idea, you will need several dozen hearts, in each of which make an incision in the center and glue. Such a composition can be placed not only on the wall, but also on the panel.
Tip: you can decorate a pillow with such hearts if you make them from felt.

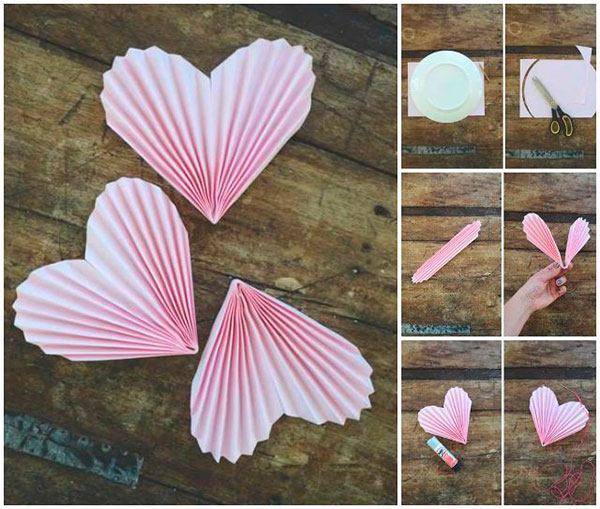
mermaid tail
The unusual shape of this souvenir is achieved by repeatedly folding the cut circle with an accordion. After that, you just need to fold in half and glue.
The geometry of love
What if not she will help you create this heart card. The most important thing here is not to make a mistake with the folds. Great option for Valentine's Day

The heart of a loved one with your own hands
Undoubtedly, all previous options fit perfectly into this category. But I want to highlight a few romantic patterns in particular for this occasion.
From felt
A classic, but such a cute heart, which can become both a separate souvenir and an element of an interesting project. For her, you just need to cut out two parts and connect them with a “forward needle” seam. Before finishing, fill the souvenir with padding polyester and sew to the end.
Tip: decorate a hearty gift with beads, sequins or buttons - then it will sparkle with new colors.

clip
And again wire fantasies. This time the heart is for the ear. It is only necessary to twist the wire so that it forms, as it were, a clamp consisting of two hearts.
Finally, I advise you to read articles about homemade gifts for your sister and dad - there are also ideas for homemade hearts here.
On this I end and say goodbye to you until the next article. Tell us about your impressions, share links in social networks. networks and subscribe!
Sincerely, Anastasia Skoreva
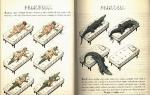
Today I will show you how to make interlaced hearts from a small piece of wood. It is clear how to make them from metal, but from wood ?! When I first saw this, I was very surprised. And now I'll tell you all how to do it. Let's get started.
We need:
- round wooden block (15cm X 5cm)
- sharp knife
- sandpaper
Let's take this bar. Choose hardwood. 
We mark up. 
And according to the markup, we remove all unnecessary. 
From the resulting "long cross" we make just such a figure. Divide lengthwise into three sections. As a result, when you remove all unnecessary, you should get a figure that looks like two plates crashed into each other. 

We mark future hearts. 
We cut them along the cut out contour. 
We also remove excess from the inside. To do this, you can use a drill and a jigsaw. Just be careful not to damage the structure. 

Now the hard part is splitting hearts. I used a shield for this. He carefully cut a narrow groove with them. You can use a sharp, thin knife. 
Well, our hearts are divided. 
And we begin the final processing of them. Sandpaper will help you. Use first large to give an even shape, and then small, for final grinding. 
As a result, you should get something similar. 

You can make amazing and original things from the remnants of lumber, for example, a box, as in this master class. Having done the work as carefully as possible, at the end you will receive an amusing little thing that you can not only keep for yourself, but also present it as a gift to someone close or familiar.
materials
To create a box in the shape of a heart with your own hands, prepare:
- a block of wood;
- thin board or piece of plywood;
- saw;
- sandpaper;
- screwdriver
- jigsaw;
- wood glue;
- varnish for wood;
- food colorings;
- hook for the door of the box;
- brush.
Step 1. On a piece of paper, draw the outlines of your box. In this case, it is the heart. Cut out the template and attach it to the wood block. Outline the heart with a pencil.


Step 2. Cut out a heart from a block. If you do not have woodworking skills, use a hand tool for this purpose.

Step 3. Stepping back from the contour of the heart a few millimeters, draw another one and carefully cut out the core of the prepared bar, be sure to leave the back wall. Correct all irregularities and roughness with a hand tool for woodworking and sandpaper. Round the end cuts.

Step 4. From the cut out core, make two small saw cuts. This will be the front and back wall of the drawer of the box.

Step 5. From the remaining piece of the core, you need to make the walls of the box. To do this, draw a contour on the end part and make a cut along it.


Step 6. Using wood glue and a vise or clamps, glue all the components of the drawer together.
Step 7. Sand the resulting box and be sure to round off all its sharp edges, making the shape as streamlined as possible.

Step 8. Paint the drawer with varnish mixed with food coloring, fasten the hardware in the front. Apply varnish in 3 layers.

Step 9. Since the heart-shaped box will not stand on a flat surface, you need to make a stand. For the latter, you will need a small piece of plywood and two solid bars in the shape of triangles. The bars need to be glued to a piece of plywood, but before that, fit them to the shape of the box by trying them on. As soon as the work is completed, clamp the entire structure with clamps and leave the glue to dry completely.


Step 10. Be sure to process the prepared stand with sandpaper and round off all edges and cuts. Color the stand with varnish, diluting it again with food coloring. This technique will allow you to color the block, but the texture of the wood will be visible through the layers of homemade paint. By the way, the layers themselves, as in the case of the box, apply three.