How to make a mother's box. Do-it-yourself master class "Mom's treasures" with a step-by-step description
Presents a very useful and interesting Master Class. Ira Derevyanko, mother of 2 wonderful boys, will tell and show how to make a box "Mom's Treasures".
What is it and what is it for?
This is a decorated box made of paper or cardboard (or a box in a box) that will store things important for the mother - a tag from the hospital, the first drawing, casts of arms and legs, a lock of the baby's hair, etc.
These are universal boxes, because from "Mom's Treasures" they can turn into "Children's Treasures" - the manufacturing principle is the same, but the contents may be different - colored stones from the sea, shells, Lego men, hairpins. Each child will find his own use, and the mother will be able to arrange such boxes in different ways, to match the future content.
So let's get started.
To make a box of "Mom's Treasures", you will need:
Thick white cardboard (like whatman paper);
Paper for design or colored cardboard;
Double-sided tape;
glue "Moment" Crystal ";
Scissors (can be a clerical knife),
pencil, ruler, eraser.
For decoration - ribbons, beads, rhinestones, everything that is at hand or will be specially bought in hardware stores or for creativity.

Separately, I will focus on designer cardboard. It can be bought in specialized stores of goods for creativity. I used 3 types of cardboard: solid pink, pink with polka dots, white embossed cardboard. All sheets are A4 size.

How to make a box "Mom's Treasures": stages of creativity
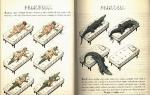
1. We make a blank for a large box:
1.1. From white thick cardboard we cut out a rectangle 20 * 29 cm, in finished form 8 * 17 cm, the height of the side is 6 cm. We measure 6 cm from each edge, draw marking lines.

1.2. Using a ruler and a needle (or use the blunt side of scissors), push a furrow along each of these lines. After - wipe the mark from the pencil with an eraser.
1.3. At the edges of the rectangle, we have formed squares. We measure 2 cm, make valves.

1.4. We bend the sides and valves. We have a blank for the box "Mom's Treasures":


Scheme of the blank for the main box (click to enlarge). You can download and print for your convenience.
2. Now, according to the same principle, we make a blank for the box lid:
2.1. We cut out a rectangle 21.3 * 12.3 cm. In the finished form it will be 17.3 * 8.3 cm, the side is 2 cm. We need an increase of 0.3 cm so that the lid is put on the box.
2.2. We measure 2 cm from each edge, draw marking lines, recesses for bending, and cut out the valves.

3. For those who still want to make inner boxes for individual "mother's treasures", we make the appropriate blanks. I have two more inner boxes: one for a cast of a pen (who still doesn’t know what it is and how to do it, you can familiarize yourself with it), so it was larger, the second for a tag from the hospital and other small memorabilia.
Size for inner boxes: large 20*17 cm, finished 10*7 cm, side height 5 cm. And a small box 16*17 cm, finished 6*7 cm, side height 5 cm. .3 cm and a side height of 2 cm.

4. Now let's get down to the fun part - decorating our "mother's treasure" boxes.
4.1. We cut out rectangles from colored cardboard to fit the sides of the boxes, but reduce each side by 0.3 cm.

4.2. Using double-sided tape, glue pieces of decorative cardboard to the sides of the box. First colored cardboard, then again white. Do not forget to reduce each next piece by 0.3 cm. This is how the “sandwich” turns out.


5. After we glue the box. It is possible with the help of double-sided tape, but for me it did not hold the sides tightly enough. I had to use the glue "Moment" Crystal "- durable, quickly seizes and does not stain the work. I do not recommend PVA, because. it will warp the paper.

6. By the same principle, we decorate the lid and small boxes.


7. Next, a little technology (where without them in our time). In the text editor "Word"We find a beautiful font and print the names on the caps: "Mom's treasures", "Child's name", "Tag from the maternity hospital", "Molds of the arms and legs", etc. I also used the shape "Oval", in which I inserted the inscriptions. We print on plain or color office paper on a color printer.
To be honest, at first I didn’t guess with the size of the oval and the font, I had to use the “poke” method. I guessed it the second time.


8. Cut out the inscriptions along the contour. You can do it on square pieces, you can use curly scissors.
9. We make a substrate from colored cardboard. We impose ovals on colored cardboard, circle with a pencil and add 0.3 cm each, cut out.

10. Connect the parts with double-sided tape. Actually, you can leave it that way. But I have outlines for painting fabric, why not use them. I made an imitation of beads with dots.

11. For further decoration of the "Mom's Treasures" box, you can use ribbons, rhinestones, beads, flowers, etc. - it all depends on your taste, skill and desire.

Why don't you be the first to know about everything? Subscribe to blog updates right now!
The birth of a child is a very important event in the life of parents. Many are looking forward to the birth of their crumbs and counting the days and hours until this date. After the baby appears in their life, for sure, parents will have fun, they will happily keep all the memories of the first days, months and years of his life. Our article provides step-by-step instruction and a video selection for studying the master class on creating mother's treasures.
Every mother wants to have a beautiful box to store many attributes of the first days of the baby. For example, to keep a tag from the hospital, or to put the first milk tooth that has fallen out. All this is an unforgettable memory that can always be shown to the baby when he grows up and remember the old days.

Today, numerous boxes and containers for storing things can be bought in stores and on the Internet. But, while you have the opportunity and desire, we recommend that you make such a charm yourself at home.

Any product that you make with your own hands will leave pleasant memories and an indelible mark on your memory. Many do not even suspect how important and necessary it is to have crafts at home that you built in wonderful times. It is always pleasant and joyful to remember such events, especially since the birth of a baby is a tremulous and long-awaited time. The first seconds, minutes, hours, days, months, years of his life are an important and unforgettable time not only for parents, but also for the baby.
All new and long-awaited days of the calendar will remain in your memory forever. But, it will be nice to have and hold real things from the past in your hands. Which carry a lot of positive energy and take you to memories that will never happen again. Be more reverent to your baby, to his things and events that will tie all the threads together in the future.
You will not regret it, a do-it-yourself box will be original and will breathe mom's love. A master class on creating a box with mother's treasures will leave wonderful memories of the first days and the anxious expectation of a miracle.

Mom's treasure boxes are made using several techniques, from scrapbooking to origami. The Internet is replete with photos and videos - do-it-yourself mk mother's treasure lessons.
We study a simple step-by-step master class on creating a box "Mom's treasures"
To make a box, you need to have:- Cardboard
- Scissors
- Lettering for printout "Mom's Treasures"
- Drawing templates.
Depending on the appearance of the baby, what gender you are expecting to be born, make your own jewelry box. From this master class you will learn how to make a box of mother's treasures step by step for a boy with your own hands.
Making a box step by step:- Download inscriptions for printing and templates for drawings.
- Form a box out of cardboard with scissors and glue, make sections in it.
- Decorate this product with drawings by gluing them to the box.
- Decorate the resulting product with inscriptions.
Your box for children's accessories mom's joy is ready. Use for joy!

The next MK will be much more difficult, but the result will exceed all expectations.
You need to have:- Notebook with diagrams, sizes of boxes.
- Pencil.
- Sharpener.
- Ruler 30 cm.
- Scissors.
- Awl for creasing.
- Draw box diagrams in your notebook. Further, in the same place, draw diagrams of small boxes that are located inside a large one.
- According to the scheme, using a pencil, draw a square, making marks on the folds, then take an awl and make a scoring at the folds.
- Cut out the blank, this lid will be for a large box.
- Bend in the marked places. It turns out the silhouette of the lid. Repeat the same action with all the boxes.
- In this case, draw squares for the lids and sides of the bottom on white paper.
- All blanks are made. Take glue and glue everything together in order.
- After that, glue the white squares onto the blue ones.
- Collect handicrafts. Glue the necessary folds.
- Complete with captions.
Your box of mom's happiness is ready. When you open it, you will get indescribable pleasure.
For a woman, there is nothing more significant than the first events associated with her child. From days spent in maternity hospital, up to the first baby tooth. Therefore, keep your memories carefully, respect the past years. Rejoice at the sight of the attributes of their memories.

Turn your days into joyful minutes and hours. Make as many memorable crafts as possible about the days of pregnancy, childbirth, the first events and growing up of the baby. For you, your child will always be small, in need of care, affection and warmth. Do not forget to express these emotions, including in the form of crafts for your child. Be tolerant and joyful, life will reward you for such a manifestation of feelings.
Video on this topic of the article
At the birth of a baby, every mother has a lot of memorable little things that remain in memory and which need to be preserved. Be sure to leave a commemorative tag from the hospital. Then, when the baby grows, the first curl is cut off, then the tooth falls out, the beloved nipple and other trifles remain. All these are such trifles, which later, after many years, you can get and admire both the mother herself and show her already adult child. So we are talking about the need for a special box-casket in which these things will be stored. Today we will make such a box using technology.
For a master class on making a box, you need to take:
Binding cardboard measuring 15 * 15 cm, two blanks and one measuring 6.5 * 15 cm;
Sintepon;
Schemes-sketches for patterns of boxes;
Watercolor paper, A1 format cut to the desired size;
Fabric cotton floral and pink in a white bow;
Scrapbooking paper for children in pink and light pink colors;
Round pictures with bunny Mi and with inscriptions;
Card with the inscription "Mom's treasures";
Metric card;
Cutting down a bunny and pink flags;
Curb punchers;
The circle is white with openwork edges;
Ribbon light pink with pom-poms;
Paper roses are white and pink;
fabric pink flowers;
Half beads are pink and white;
Metal pendants: tooth, clothespin, stroller, scissors;
Peach organza ribbon 10 mm wide;
Buttons acrylic pink flowers;
Pink cotton lace;
Color printed tags: tooth, curl, tag and pacifier;
Wide pink satin ribbon, width 25 mm;
Adhesive with the effect of double-sided tape;
Scissors, ruler, simple pencil, double-sided tape;
Glue stick and thermal gun;
Sewing machine.

So, there is a lot of work to be done, so we proceed and start with the manufacture of a soft cover. We take binding cardboard, lay out all three parts tightly side by side and cut out two strips of 3 * 15 cm from watercolor paper. We divide them both in half.


Now we glue both with a glue stick on the joints of the cardboard, so we glue them together.


We turn over the cover and now measure the sheet of synthetic winterizer. Glue it to the cover with pieces of double-sided tape.


Now cut off the fabric. We will have pink with bows around the edges, and a flower inside. Do not forget to make reserves for the collar, at least 2 cm.


We iron the fabric well with an iron and sew it together, sew pink lace on the joints. Now we turn the fabric over, put the cardboard cover and glue the fabric to the cover with a glue stick.


Now we cut off a strip of a wide pink ribbon and glue it in the center from the inside of the cover.


We wrap the cover and try on cards and inscriptions. We sew the cover along the edges of the front side and each card. Now we cut out a blank 14.8 * 25 cm from a large sheet of scrap paper.


We glue it inside our cover with glue with the effect of double-sided tape and put it under the press for 1-1.5 hours. In the meantime, let's take care of the inner big box and the small ones.


According to the schemes, we cut out a large workpiece.


And these are for small boxes. We smear the tongues with a glue stick and glue a small box. So we make 4 small boxes and 4 lids.


From small sheets of scrap paper, cut out four squares 6.5 * 6.5 cm for the lids and one 14 * 14 cm for the bottom of a large box. We glue the scrap blanks on the watercolor strips of adhesive tape and sew on with a machine.


We glue a large box on the tongues.


Now we cut off strips from the border sheet, punch holes on both sides with a lace hole punch and glue on the sides of the large box, first a strip of lace, then a lace strip of paper.


We also glue the lids of small boxes.


Now we glue the bottom (large box) to the cover, smooth it well and press it lightly.


Now we glue labels with inscriptions and bows with pendants on small boxes.
The birth of a child is a very important and reverent event in the life of parents. Mothers enjoy every new day of their pregnancy and look forward to the birth of their baby. After the birth, new mom and dad are waiting for a lot of new happy emotions. How do you keep those wonderful memories? A special treasure chest will help in this matter. For years in such a cute little thing such important things as a pregnancy test, the first ultrasound, a tag from the hospital, curls of the first hair, the first fallen tooth can be stored. The master class "Mom's Treasures" will tell you how to decorate this product beautifully.


Materials for manufacturing
Before you learn how to make a box of mom's treasures, you need to read the list of materials for work and buy everything you need.

— sheets of Goznak drawing paper in A1 format;
- thick cardboard (thickness 1.5 mm);
- a ruler made of metal (length from 50 cm);
- plastic ruler (30 cm);
- paper knife;
- sharp scissors;
- thin creasing;
- a simple pencil;
- scrapbooking paper;
- wide lace;
- cotton or satin ribbon;
- cotton fabric;
- inscriptions for printing;
- synthetic winterizer or hallofiber;
- Super glue;
- decorations for decoration;
- templates for printing.
Jewelry box patterns


In order not to make a box pattern on your own, you can download and redraw it on a special paper for this, Goznak. Or immediately redraw from the monitor.

In total, you need to make 4 small boxes, one large and one base box. On the first sheet draw all the small boxes, on the second - large ones.
When the drawings are completely ready, cut them out with a slanting knife on a rubber mat. It is worth paying special attention to the places where the arrows are drawn. In these places, it is important to cut out the elements exactly along the main black lines so that the box closes well.


The result can be seen in the photo:

Small box:

Pattern large:

The foundation:

Product assembly
Now further actions with the future box will be described step by step.
At the beginning of work along the dotted lines, go through the scoring under the ruler.

Pay due attention to the base box: all lines should be clear parallels and perpendicular.

Then assemble the boxes, smearing the "ears" with superglue.


The result should be four small boxes and one larger one.

Collect it and glue it. In the end, you should get a neat box. The cardboard should ideally stand inside the walls.


Box decoration
For decor from paper, you need to cut out a piece of size 18.9 * 7 centimeters. Draw a creasing in the center, cut the corners 45 degrees to this line. Stick to outside boxes.


Using lace, decorate the outer walls, while closing the joint of the spine. Leave part of the side free.


Scrapbooking is on the way. Cut out scrap paper:
- 4 squares with a side of 4.8 centimeters;
- detail 12.1 * 5.8 cm;
- detail 12.1 * 1.8 cm;
- 4 parts 5.8 * 1.8 cm.

Make small loops from the ribbon.

Write the name of the boxes on small leaves, or print it on a printer in a beautiful font.

Paste the boxes beautiful paper, inscriptions, stickers and other decorations.

Making a cover
For the cardboard cover, cut out the details of the cover: rectangles 14*20.5 centimeters and 13.7*20.5 centimeters, spine 20.5*7.

Glue all the details on the synthetic winterizer, leave gaps of half a centimeter.
Cover the cover with cotton, preferably Korean.

Decorate the cover, sew on all the elements, lay a line.


Make a flyer.

Mk "Mom's Treasures" is finished with his own hands. The box is ready! Such a product is useful for both a boy and a girl.
Video on the topic of the article
Every mom has little things dear and dear to her heart related to her baby and his expectation: a pregnancy test, the first ultrasound, a tag from the hospital, a lock of hair, the first fallen tooth taken away by the Tooth Fairy... And you can keep all these wonderful memories in a special treasury box, made by all means with your own hands and beautifully decorated..


Necessary materials:

- A couple of sheets of Goznak drawing paper, A1 format. The paper of this manufacturer is of the highest quality and it is very convenient to work with it. Sold in a regular stationery store, protected by Goznak watermarks.
- Thick cardboard, 1.5 mm thick.
- Long ruler made of metal - from 50 cm.
- Plain plastic 30 cm ruler.
- Paper knife, scissors.
- Thin creasing (a non-writing pen will do).
- Pencil.
- Scrapbooking paper.
- Wide lace (a little over a meter).
- Cotton or satin ribbon.
- Cotton fabric.
- Sintepon.
- Transparent Glue "Moment".
- Any decorations.
- Templates for printing.
- Good mood and confidence a positive result, because everything that did not work out the first time will definitely work out the second.
Drawings of patterns for Mom's treasures


Already existing drawings of boxes you can download and redraw on Goznak paper. And you can work directly with the image on the monitor - as you like.

In total, we make 4 small boxes, 1 large and 1 base box. On one sheet all the small boxes will be located, on the second - large ones.
When the drawings are ready, cut them out with a slanting knife on a rubber mat. Pay special attention to the places marked with arrows - it is important to cut exactly along the main black lines so that the box closes correctly.


As a result, we get the following result:

Small box:


Assembly
We pass along the dotted lines with scoring under the ruler.

We pay special attention to the base box: all lines must be clear parallels and perpendiculars.

We assemble the boxes, smearing the "ears" with Moment glue.


We get 4 small boxes and 1 larger box.
We cut out 2 parts 18.7 * 6.7 cm and 2 parts 12.7 * 6.7 cm from cardboard, glue them on the sides of the base box.


We assemble it step by step using glue. At the end we have a neat box; the cardboard should fit perfectly inside the walls.


Mom's treasures: decoration
We cut out a piece of paper with a size of 18.9 * 7 cm. We draw a creasing in the center, cut off the corners at 45 ° to this line. Glue to the outside of the box.


With the help of lace, we decorate the outer walls, at the same time closing the unsightly joint of the spine, but leaving part of the side free.


Cut out scrap paper:
- 4 squares with a side of 4.8 cm;
- 1 piece 12.1*5.8cm,
- 1 piece 12.1*1.8cm,
- 4 pieces 5.8*1.8 cm.

We make small loops from the tape.

You can beautifully write on small pieces of paper what you put in the box, or you can use modern technologies and inscriptions for printing can be found on the Web or made independently in a graphic editor.

Can be tinted with distress ink.
We decorate the boxes with paper, inscriptions, eyelets and other decorations of your choice. Many of them can be bought in stores with scrapbooking.

Cover
We cut out the details of the cover from cardboard: rectangles 14 * 20.5 cm and 13.7 * 20.5 cm, spine 20.5 * 7 cm.

We glue all the details on the synthetic winterizer, leaving gaps of half a centimeter.
We cover the cover with cotton. In the photo, the close-fitting is made by two types of Korean cotton.

We decorate the cover by sewing on all the necessary elements, laying a line in the right places.

After that, we glue the cover to the album using the previously glued "binding" part. We do not glue the spine.

At the end, we draw up a flyleaf.

Using our MK "mother's treasures", you have created a box of memories with your own hands that you can pass on to your baby.


Video Compilation
In the video you can find ideas for creating mother's treasures for both a boy and a girl.