Crafts flowers from improvised material. DIY flowers from improvised materials: step-by-step diagrams for beginners
The catholic Easter symbol has long been considered a bunny or a rabbit. These animals praise fertility. When spring came, villagers noticed frequent raids of hares, they could be found in gardens and kitchen gardens, they were looking for something to eat. That is why the godchildren, coming to adults, hunted for a bunny, looking for hidden eggs, which supposedly the animal itself decorated. To date, the symbolism of Easter in needlework has become an origami hare, which is used in holiday compositions, decorating baskets with eggs. In addition, a paper animal will be an excellent decoration for a Christmas tree or a spring composition on a windowsill.


Crafts for beginner craftsmen paper bunny is considered the most popular in the origami technique. It is not at all difficult to make it, the main thing is to follow the step-by-step instructions, which will gradually reveal the secrets of paper technology. So, in this article we will talk about how to fold a rabbit - we will consider several master classes, each of them is interesting and unique in its own way.
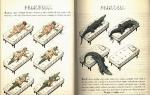
Let's start with a simple mk for beginners and try to assemble an origami hare craft on our own. The first photo shows what should happen after you follow all the steps step by step. Below is the origami hare diagram itself, which details the successive steps of the master class.
We provide a scheme for folding paper crafts, which was developed by the Japanese origami master F. Shingu. Follow the instructions exactly, you will get an origami paper hare, as in the picture. The work will not take much time, and its degree of complexity is designed even for the smallest craftsman. To learn how to fold without peeking, do the same steps several times.

Instructional video
Instructions for collecting an origami hare with your own hands may seem complicated, although in fact everything is much simpler, the main thing is to try. A video that will tell you about the secrets of folding crafts will help you make sure of the simplicity of execution.
Video: Modular Origami Hare
In addition to the usual paper animal, according to another proposed video, you can make a modular origami bunny, here you should also understand this technology yourself and surprise your loved ones with a bright toy.

Making a rabbit head
If you have to sit somewhere with the baby in line, or travel for a long time in transport, you can pass the time interestingly by making a hare out of paper. To do this, we will also use the description and instructions, having studied them in advance, then at the right moment you will be able to entertain your little fidget. The schemes are simple, and therefore an origami bunny made of paper can easily turn out even for a child of preschool age. After making this animal, make a lot of these to make a whole “horde”, and then play skits with them if the child is very small. You can also decorate the window sill or hang it on strings around the window, thus making a spring or winter composition. So our comments step by step photos and assembly diagram.

Origami hare, where to start: fold a square piece of paper diagonally, dividing it equally. Fold the resulting triangular figure in half again to mark the middle. Fold back the sheet.


Next, you need to bend the lower edge of the triangle to the top along the segment indicated by the dotted line. Continue to create origami of a hare, for this, bend up the lower corners of the triangular figure so that they touch in the middle. Turn over the resulting workpiece.


Our origami hare is almost ready! Bend the top and bottom corners so that the muzzle is completely framed.

We dismantled the most simple instructions by which even a child can be taught. Let's move on to a more complex master class, although it will not require much effort.
 Another way to fold the rabbit's head:

We fold the eared rabbit
Paper crafts are easy and fun to make, besides, the process develops attentiveness and fine motor skills of kids' fingers, which is especially important at preschool age.

Make a diagonal bend of the paper sheet. Bend the corners to the bend. Bend the protruding corner.


Bend it back along the dotted line. Corners, which are on the side, bend obliquely. Flip the origami hare.


Bend the corner to the opposite side. Fold in half away from you. Pull out the ears.


Cut with scissors. Bend over. Expand your ear.


Straighten and bend it, give the bunny volume. Make the same ear blank on the other side.


Origami is ancient art, which many associate with the land of the rising sun. However, today the manufacture of funny simple and luxurious complex paper figures is popular all over the world.
Ordinary origami is familiar to many from the figurines of cranes, boats and hats from newspapers. The essence of the technique is to fold and bend a piece of paper, to create a figure without using scissors.


Kirigami is creativity already using scissors.

Also, animals are sometimes made using the technique of raw (or wet) origami. Products are folded from paper moistened with water, which makes the fold lines clearer. A prerequisite is the presence of water-soluble glue in the composition of the paper.

The most patient and diligent will surely like to create using the "modular origami" technique. Animals, flowers, toys different shapes can be created from colored modules - parts folded from paper quadrangles with pocket corners.

And yet it is better to start making animals with ordinary origami.
Instructions for beginners origami paper
To create any product according to the scheme, you need to learn to understand conventions. There are many of them, let's just talk about a few.
There are two main ways to fold:
- "Mountain" is a fold away from you, it is indicated by a dotted line with dots.
- "Valley" - folding paper on itself, indicated by a dotted line in the diagram.
The inflection (that is, the fold) is indicated by a broken arrow.
The “lightning” fold (aka “step”) is, in fact, a combination of “mountain” and “valley” (it happens in the reverse order - “valley” and “mountain”).
Also, the diagrams indicate a bend outward or inward, a turn in one plane or to the other side, inversions, turns, openings, inflations, cuts, the presence of equal parts or equal angles.

As for paper, you can start learning with office paper. It is affordable, quite dense and durable, it can be just white or multi-colored.

You can also try to create the first products from durable foil or from the pages of glossy magazines. If you want to surprise and amuse the birthday boy or newlyweds with an original gift, you can make a symbolic figurine of an animal from a banknote (the so-called manigami).

But ordinary colored paper for schoolchildren is hardly suitable for origami - it does not have sufficient rigidity, there may be color problems on the fold lines. It is better to take a special thick colored paper. In some stores you can buy special sheets for origami.
 To understand the intricacies of the instructions, you can start with an easy-to-make one-color animal - for example, fold a puppy figurine.
 .
.
Photo origami animals
It is better to start learning origami with small-sized products. For example, these cute little dinosaurs are made from a sheet of paper using a fold and fold.

It is very easy and quick to fold the muzzles of animals - a pig, a cat, a dog. It is worth drawing the characteristic muzzles - and funny toys for kids are ready!

When the basic techniques are mastered, you can begin to manufacture more complex products. For them, it is worth stocking up on thicker paper (wrapping paper and pieces of wallpaper will do). This elephant has smooth rounded curves due to the paper's ability to maintain a certain shape.

Modular origami is a huge opportunity for creativity. Animal figurines in this technique are dense, durable, but much more time has to be spent.

Volumetric origami animals, how to make paper origami hare, master class

These colored hares can move - in their hands they squat, straighten their backs, they can slightly bow their heads and press their mouths against the lush grass.
To make such an animal toy, you need a square sheet of paper.
- The sheet is folded in half diagonally, then in half again.
- Each "wing" of the resulting triangle is folded in half outwards.
- The triangle must be picked up so that the "pockets" with the vertices A, B and C are on the top right, and the obtuse angle is on the bottom right.
- The extreme vertices A and B are wrapped back, as shown in the figure, forming triangles with a right angle on both sides from below. The middle vertex C remains fixed.
- Next, the tops A and B are folded in half outward, forming the blanks of the ears.
- Vertex C bends inward.
- The edge of the top C is divided into two parts and "clasps" the ears. The left corner bends inward for the tail.
- The ears need to be unfolded and flattened, and the sharp edge of the spout should also be wrapped. Then flatten the muzzle and form two folds along the edges of the spout.
- Raise the tail up and make folds on the sides of the body (top and bottom).
- Slightly lower the tail, forming another crease. Bend out their front legs.
Volumetric paper hare is ready.

Paper origami cat, origami paper cat, step-by-step instruction cat crafts with photo
Option 1.
Let's try to make a black cat. To do this, take a square of one-sided colored black paper.
Lay the square wrong side up. We fold the corners on both sides so that we get a quadrilateral, and its black part forms an acute angle.
- We fold as shown in the figure to make a hexagon from a quadrilateral.
- We make a fold on a sharp corner.
- Fold the resulting figure in half.
- We bend the blank of the black cat a little to the left of the center.
- Expand the left top of the workpiece, bend the sharp edge.
- We create two more folds to make a hexagonal muzzle.
- Using the same method, we bend and fix the tail.
- We bend the corners at the bottom of the animal inward to get stable paws that continue the straight line of the tail.
- We bend part of the muzzle outward so that a white corner forms below.
- We bend the top of the white triangle on the muzzle to make a black nose.
- With two folds we outline the lines of the ears.
- Eyes are cut out and glued to the finished cat - two white circles and two dark, smaller ones.

Option 2.
And this very simple cat consists of two parts and is made of two squares of one-sided thick colored paper.
- A square sheet of paper is taken, one corner is bent from the inside out.
- The opposite corner is bent from the outside inside out to the middle of the sheet. Then the sheet is folded in half, turning into an unstable trapezoid.
- The upper corner of the trapezoid bends down.
- Then the second corner is bent.
- It turns out a square of two identical triangles with a gap in the middle.
- We bend the triangles on both sides of the gap up.
- Bends down the middle upper corner.
- Flipping the figure reverse side- it turns out the preparation of the cat's face.
- We bend the top of the triangle outward - we get a small nose. You can also draw or glue eyes - two white circles and two black ones in them.
- Let's start making the body. We take a square and also put it inside out. We bend the left and right edges to the center, observing axial symmetry. It turns out a quadrilateral.
- Fold the rectangle in half (right side out).
- We bend the figure closer to the center, leaning an acute angle to a blunt one.
- We bend the sharp part to the right.
- The body of the cat is ready, now you need to turn it over.
- We attach the head to the inverted torso. Kitten is ready!

There are many more options for making cute kitties.
How to make an origami fox out of paper, master class
There are many ways to make an origami fox.


We offer a very simple option for children and beginners.
To make an animal, you need a square piece of paper.
- The edges of the sheet need to be bent towards the center, making a new square (smaller in size).
- Flip the new square over and fold in half.
- Turn the sharp corners of the resulting triangle to the center, observing axial symmetry.
- Fold the resulting square in half again.
- Rotate the resulting triangle with an obtuse angle down. The right acute angle should consist of three parts. Bend the first part so that it forms ears with the third.
- Flatten the second part on top to make a muzzle.
- Bend the left edge of the figure so that the resulting tail gives stability to the fox.
- Finish the animal to finish the eyes and nose.

And here is another scheme for making a cute fox - for those who have already figured out the conventions.

How to make a dog out of origami paper, step by step with a photo
- First, a square sheet is taken (in the photo - one-sided colored paper). It is desirable to pre-outline future bends on it, as shown in the figure. Such "tips" will greatly facilitate subsequent work.
- First, the lower corner is bent, then the side ones.

- When the three corners are evenly folded, the paper is flipped over to the colored side so that the unfolded corner is on the bottom.
- The side corners are taken from the other side, folded along the marked lines and connected in the center, as shown in the figure.

- The two vertices of the resulting figure are arched, as shown in the figure.
- Then the upper corner is unfolded and the figure is turned over with the white side out.

- Three bends are created, as in the figure, and the figure folds up. Then the remaining white square is folded into a triangle.

- A muzzle is formed from the upper segment; the left corner bends, forming a tail. The next stage - the muzzle is divided into two parts by a fold, the sharp corner turns out and turns into a white nose. The tail is slightly curved and thinned. The bottom of all four paws turn outward so that the figure becomes stable.

And this paper toy "biter dog" will surely become an active participant in children's games.
By the way, mastering the manufacture of animals using the origami technique is useful not only for children and their parents who want to create toys with their own hands. Such activities develop mindfulness, logic, spatial thinking, as well as another quality necessary in everyday life for everyone - patience.

Origami hare is one of the most popular paper origami. If you do not know how to make an origami hare, then on this page you will find everything you need to assemble this simple paper figurine.
In the first photo you can see what you get if you follow the assembly diagram below. The second photo of the origami hare was taken by one of our site users. He got a hare that even a beginner can collect. If you have photos of the origami you have collected, send them to the address This adress Email protected from spam bots. You must have JavaScript enabled to view.

Assembly diagram
Below is an assembly diagram of an origami hare from the famous Japanese origami master Fumiaki Shingu. If you strictly follow the instructions, then assembling the origami hare will not take much time, and the result will be the same as in the picture. After doing what is described in the diagram several times, you will understand how to make an origami hare quickly and without peeping into the diagram.

Videos master class
Assembling an origami hare for beginners can seem like a daunting task. Therefore, we advise you to enter the query "origami hare video" on the largest video hosting site on the Internet, YouTube. There you will find many different videos about the origami hare, which clearly show the steps for assembling the hare. We hope that after watching the video of the assembly master class, you will have no more questions on how to make an origami hare.
If you are fond of modular origami, then you will definitely like this modular hare:
Here is another easy way to make a paper hare:
Symbolism
The hare in many cultures is the "lunar animal". He personifies rebirth, the return of youth, as well as intuition and light in the darkness. Often the hare symbolizes life that has passed through death. In many traditions, it is a symbol of fertility, love, worldly wisdom, speed, agility.
Many people like to make crafts in the form of animals. To understand how to make a paper hare with your own hands, you need to follow the instructions step by step. In the origami technique, many different products can be folded, but it is this craft that is most popular. A master class for beginners will tell you how to make a paper hare yourself.
easter bunny
This version of the paper origami craft is a hare holding an egg in its paws. Making it is pretty easy. It will take two square sheets of paper, equal to 21 cm.

That was more clear how to make an origami paper hare, you can watch a special training video.
Figure from paper strips
A child from 6 years old can make such a hare. For work you will need:
- White sheet of paper.
- Colored paper.
- Scissors.
- Glue stick.
- Markers.
 Fold a white sheet of paper in half. On one half, draw three strips, the width of which is 1.5 cm.
Cut out two short strips from pink paper, round the edges - these will be the ears.
The second half of a sheet of white paper fold in half and cut out two wide strips. Make one strip shorter by bending it at the edge and cutting off a small part of it.
Glue the resulting strips in the form of cylinders and fasten the side parts together. This will be the body and head. In the same way, glue the paper cut off from the strip, you get a tail.
For two narrow strips 1.5 cm wide, connect and glue the ends. You will get two rings, each to give the shape of a droplet. Glue pink stripes on these blanks. Ears are ready.
For making paws cut the third narrow strip into two equal parts, make rings from each.
Glue the ears, paws, tail to the craft. Cut out of paper or draw with a felt-tip pen the eyes, nose and mustache. The rabbit is ready.
Napkin craft
To decorate festive table, you can fold napkins in the form of hares. It is proposed to make any of four options for crafts:

A simple version of origami
The next master class will tell you how to make a do-it-yourself paper bunny in 15 minutes. You will need the following materials:
- Blue, red and orange paper.
- Black marker.
- Scissors.
A square cut out of blue paper must be folded diagonally to form a triangle. Bend the edge at the base of the figure. Bend the opposite corners to the middle of the triangle so that they are at the top - these will be the ears. Turn over the workpiece. Bend back the upper corner of the square, glue it. Do the same with the bottom corner of the square. It turned out the head of a hare.
Cut out a circle from red paper to make a spout. Eyes can be drawn with a marker. Bunny is ready.
To make a more complex version of the craft, you will need visual drawings that are easy to find on the Internet. When using the modules, a voluminous origami hare is obtained, the scheme for children is quite simple.
Attention, only TODAY!