Exercises for lumbosacral radiculitis: step-by-step instructions. Exercise therapy for radiculitis
Physical therapy for radiculitis first mate.
Unlike drug treatment, which only helps eliminate the symptoms of exacerbation of the disease, physical exercise helps eliminate the very cause of sciatica.
It is important to understand all the rules for using physical therapy for radiculitis, when you can perform physical exercises so as not to worsen the health situation and what they should be.
Not all exercises are suitable for treating radiculitis.
It is necessary to use only complexes specially designed for this purpose, developed by specialists.
What is radiculitis, symptoms
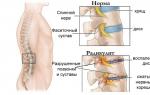
Radiculitis affects the peripheral nervous system. It occurs due to pinching of the nerve roots of the spinal cord. At the same time, the latter are subject to an inflammatory process and can even be damaged due to serious pinching. This disease characterized by periods of exacerbation and remission.
During periods of exacerbation, severe pain occurs in the affected area of the spinal column.

The cause of exacerbations of radiculitis can be:
- stressful situations;
- hypothermia;
- passive lifestyle;
- playing sports;
- progressive osteochondrosis;
- hard physical labor;
- tumors of the spinal column;
- expanding osteophytes;
- deposited salts.
Depending on the location, the following types of radiculitis are distinguished::
| Cervical | Soreness appears in the neck and occipital region. The pain increases significantly with coughing and head movements. |
| Cervicobrachial | Pain occurs in the neck, shoulders and upper extremities. |
| Chest | Manifests itself as girdling pain in the sternum area. |
| Lumbosacral | Characterized by pain in the lumbar region, which can radiate to one of the lower extremities. |
Traditional treatment of sciatica
 Traditionally, sciatica is treated conservatively. The patient is prescribed:
- anti-inflammatory drugs (Diclofenac, Ortofen, Ibuprofen);
- painkillers (Ketonal, Movalis);
- novocaine blockades;
- muscle relaxants (“Mydocalm”, “Sirdalud”);
- warming ointments based on bee or snake venom;
- B vitamins.
Severe damage to the intervertebral discs may require surgical treatment.
In addition to drug and surgical treatment for radiculitis, physiotherapeutic procedures are prescribed to relieve the inflammatory process, as well as to accelerate tissue regeneration and have a warming effect. Manual therapy and visits to a massage room and exercise therapy room are also recommended.
Video: "Exercises for acute back pain"
The use of exercise therapy for radiculitis
Did you know that...
Next fact
Exercise therapy plays one of the most important roles in radiculitis.. Therapeutic physical exercises are prescribed for any type of radiculitis. Only the set of exercises itself can differ.
Exercise therapy is aimed at strengthening the spinal column, increasing its functionality by strengthening the surrounding muscle corset, including the abdominal muscles, which play an important role in maintaining the lumbar region of the spine.
Besides therapeutic exercises improve blood circulation, which has a positive effect on the condition of the spinal nerves, improving their nutrition and swelling of soft tissues, helping to eliminate existing swelling.
For radiculitis, all exercises should initially be performed in a gentle manner. Only gradually can you increase the intensity of physical activity. Exercises should be performed from simple to more complex.
 Exercises that involve a lying position must be performed on a hard, flat surface. Ideally, use a specially designed mat during classes.
Physical therapy classes are not prescribed to patients:
- during the period of exacerbation of radiculitis (there is a high probability of only aggravating health problems);
- for cardiac pathologies;
- with intervertebral hernias, in which there is a possibility of damage to the spinal cord;
- with increased ESR;
- with an increase in body temperature.
Even if you do not fit into the category of patients for whom there are contraindications to exercise therapy, Before starting the exercises, it is still recommended to consult a specialist, which must give its approval for this method of treating radiculitis. In addition, exercise therapy is an excellent prevention of this disease, and also helps to recover faster after surgical treatment.
Video: "Gymnastics for acute radiculitis"
Exercise therapy for the treatment of radiculitis, technique
For cervical radiculitis, the following set of exercises is recommended::
- I.P. – standing, legs brought together. Bow your head towards your chest so that your chin touches the chest. In this position, make smooth movements of your head from left to right and vice versa, without lifting your chin from your chest. Repeat up to 15 times.
- I.P. – standing, feet together. Slowly move the back of your head back, almost touching it to your upper back. Stay in this position for at least 2 seconds and return to the starting position. Repeat 10-15 times.
- While standing, make circular movements with your head, without allowing strong deviations back (i.e. movements should be performed along the minor axis). Repeat at least 10 times.
- The fingers of both hands are clasped together at the back of the head. In this position, tilt your head forward, completely touching your chest. In the final position, completely relax and hold for about 10 seconds. Then return to the starting position. Repeat 15-20 head tilts.
- Standing with your feet shoulder-width apart, place your chin on your right hand, while clasping the back of your head with your left. In this position, make smooth movements with your head to the right side, holding at the end point for 20 seconds. Then return to the starting position. Repeat 15-20 times. Then change your hand and repeat the same manipulations, but only in the opposite direction.
For thoracic radiculitis, you can perform the following set of exercises in the starting position standing:
- Place your feet shoulder-width apart, bend both arms at the elbow joints at chest level. Raise your arms to the sides as you inhale, trying to bring your shoulder blades together and return to IP. on exhalation;
- Bend your arms at the elbow joints and place your hands on your shoulders. Alternately raise your left and right arms up so that they form a right angle with your shoulders and stay in this position for a few seconds. Then you can raise both hands together. It turns out: one lift - the left hand, the second lift - the right, the third lift - both hands together. Each position must be repeated at least 5 times;
- Bend both arms at the elbow joints. Raise your arms bent at the elbows up and back into IP, holding at the top point for 2-3 seconds;
- While lying on your stomach, alternately lift your left arm and left leg, and then your right arm and right leg. Lifting should be done while inhaling. There should be 8-10 lifts for each pair of limbs.
- Feet shoulder width apart. Swing alternately with each upper limb in the corresponding direction, i.e. left - to left, right - to right. Swings should not be sharp. Repeat 10-15 movements in each direction.
For lumbosacral radiculitis, the following exercises are recommended::
- In a standing position, spread your legs shoulder-width apart. Bend your arms at the elbows and place them on your lower back. Perform smooth bends alternately to the right and left, pausing at the bottom point for 3 seconds and returning to I.P. Repeat 10-15 times.
- Standing with your feet shoulder-width apart, gently bend your body forward and backward., lingering at the bottom point for several seconds. Your hands should be on your lower back. Repeat at least 10 times.
- Standing, feet shoulder-width apart, arms in a free position on both sides of the body, bend back and forth. The tilt should be while inhaling, and you should try to reach the floor with your hands. At the lowest point, freeze for 2-3 seconds. Repeat 5-10 bends in each direction.
- Lying on your stomach, place your arms loosely on either side of your body. As you inhale, leaning on your forearms, simultaneously lift your head and shoulders up, holding at the top point for 2 seconds, then return to IP. Repeat at least 5-7 lifts.
- Lying on your stomach, clasp your hands behind your back. As you inhale, lift your head up, while bending in the chest area. At the top point, pause for 2-3 seconds, and then exhale, return to the starting position.

Conclusion
Exercise therapy plays an important role in the treatment of radiculitis. But you should not resort to it without consulting a specialist. All exercises must be performed under the supervision of an instructor, who will ensure that the exercises are performed correctly and will help prevent mistakes that could aggravate the health condition.
Exercise therapy is aimed not only at strengthening the spinal column, but also at strengthening the muscle corset surrounding it, as well as improving blood circulation. It is not always possible to resort to therapeutic exercises for radiculitis. Therefore, consultation with a doctor comes first. It will not be possible to completely cure radiculitis by resorting to exercise therapy alone, so treatment of the disease should be carried out comprehensively - you should not refuse drug treatment.
The most effective resistance to radiculitis will be gymnastics - this is a set of effective exercises that will help you strengthen the spine and develop its functionality due to trained muscles. It is especially important for radiculitis to strengthen the muscles of the anterior abdominal wall.
If they are weak, then there is an even greater deflection of the spine in the lumbar region and hence problems arise in this place. Therefore, the goal of therapeutic exercises for radiculitis is primarily to strengthen the abdominal muscles.
To perform the exercises, you need a hard surface - it is best to lie on the floor, put a terry towel or a small rug under it. The room should be warm; you should wear tights on your legs that cover your knees. The entire set of exercises is performed lying on the floor - in the most gentle position of the spine.
The main set of exercises for radiculitis
1. Starting position - lying on your back, legs slightly bent at the knees, arms lying along the body. In order to perform this exercise correctly, place your hand on your stomach: tighten your abdominal muscles, you should feel that they have become hard, without straining or holding your breath. Repeat 10-15 times.
If you perform the exercise correctly, the lumbar spine bends slightly upward. If you experience pain while performing the exercise, you can slightly modify the exercise - put your feet on the floor, left or right.
2. Starting position - lying on your back, legs bent at the knees on the floor, arms lying along the body. Raise your upper body slightly, while keeping your legs on the floor. Hold this pose for 5-10 seconds and then slowly lower your torso to the floor. Take a break for 5-10 seconds and repeat the exercise another 10-15 times. At first, perform the exercises with your arms extended forward, but later on, make it more difficult by placing your hands behind your head. 
3. Starting position - lying on your back, legs extended forward, arms lying along the body. Bend one leg at the knee and lift it slightly off the floor. Then straighten it along the hip line and slowly lower it. Repeat 10-15 times. Do the same with the other leg. And then perform the exercise 10-15 times, lifting and bending both legs together at the knee.
4. Starting position - lying on your back, bend your legs slightly at the knees, arms lie along your body.Extend your right arm forward and place it on your left knee. Bend your left leg at the knee, while at the same time resting your right hand on your knee, and do not let it get closer to your head. Do it with little effort for 10 seconds, then rest for 10-15 seconds and repeat the exercise another 10-15 times. Do the same, changing position: your left hand should rest on your right knee.
5. Starting position - lying on your back, place your arms along your body, stretch your legs forward. Raise both legs above the floor, 30 centimeters from the floor. Hold this pose for 5 seconds and slowly lower your legs to the floor. Repeat 10-15 times.
6. Starting position – lying on your back, place your arms along your body. Make a “bicycle” with your feet - spin imaginary pedals.
7. Starting position - lying on your back, stretch your legs forward, place your arms along your body. Lift both legs off the floor and perform horizontal scissors with your legs - alternately crossing your straight legs in front of you. Start with 5 repetitions and gradually increase to 10-15 repetitions.
8. Starting position – lying on your back, place your arms along your body. “Bicycle” with your feet - spin imaginary pedals in the opposite direction.
9. Starting position - lying on your back, place your arms along your body, bend your legs at the knees. We make a “bridge” - resting your shoulder blades on the floor, straighten and lift your lower back from the floor upward.Stay in this position for 5-10 seconds and then return to the starting position. Repeat 5-10 times.
10. Starting position - lying on your back, bend your knees, spread your arms to the sides, palms down. Alternately place both legs bent at the knees to the right and left of the body. Repeat 10-15 times.
11. Starting position - lying on your stomach, hands under your chin. Raise your straight leg up, hold for 5-10 seconds, lower your leg. The same thing, but with the other leg. Repeat the movement with each leg 10-15 times.
12. Starting position - lying on your stomach, put your hands to your shoulders, and perform the breaststroke movement with your hands. Repeat 10-15 times.
13. The same as in exercise No. 11, but only extend your arms forward and raise one arm together with the opposite leg raised (i.e., if you lift your right leg up, then you need to simultaneously raise your left arm and vice versa).
14. Starting position - lying on your stomach, put your hands behind your back, clasp them behind your back and, connecting your shoulder blades, lift your head and shoulders up. Repeat 10-15 times.
The final part of the complex is stretching and relaxation exercises.
And at the very end, final exercises to relax and stretch the spine:
15. Starting position - lying on your back, place your arms along your body, stretch your legs forward. Pull your leg bent at the knee towards you, press it to your chest, lower your leg to the floor. Same thing with the other leg.
16. Starting position - lying on your back, bend your legs at the knees, place your arms along your body. Place your hands on your knees and pull both legs towards you, wrap your arms around your legs and slowly twist your torso left and right. A very good exercise for massaging the lumbar back. Repeat 5-10 times.
17. The same as in exercise No. 16, only do rolls not left to right, but forward and backward - massage the entire spine. Repeat 5-10 times.
Start doing all exercises with 5 repetitions, no more. Then, as you master the set of exercises for the lumbar spine, increase the number of repetitions to the recommended number. During pauses between exercises, try to relax the muscles of your arms, torso and legs. After the first classes, your muscles may ache a little, this will go away in a few days. You can include exercises of this gymnastics for radiculitis in, which has already been published
The set of exercises used for lumbosacral radiculitis includes exercises for the pelvis and back, as well as for the lower extremities.
Exercise No. 1. Starting position: standing, feet shoulder-width apart, hands on the waist. Bend to the left, hold for 3-4 seconds, return to the starting position. Bend to the right, hold for 3-4 seconds, return to the starting position. The maximum number of tilts made in one direction or the other is 10–12. The exercise is performed at a slow pace. If no discomfort or pain is felt, then you can switch to a medium pace. Also, the pace can be combined: first, bends are performed 4 times at an average pace, then 4 times at a slow pace and again 4 times at an average pace. Movements should be smooth, without jerking.
Exercise No. 2. Starting position: standing, feet shoulder-width apart, hands on the waist. Lean forward a little, hold for 2-3 seconds, straighten up. Lean back a little, hold for 2-3 seconds, return to the starting position. The maximum number of bends made back and forth is 8-10. The exercise should be performed at a slow pace, smoothly, without jerking, and monitor for pain.
Exercise No. 3. Starting position: standing, feet shoulder-width apart, hands on the waist. Turn to the left, hold for 3-4 seconds, return to the starting position. Turn to the right, hold for 3-4 seconds, return to the starting position. The optimal number of turns in one direction or the other is 10–12. It is better to perform the exercise at a slow pace, but medium and combined are also suitable.
Exercise No. 4. Starting position: standing, feet shoulder-width apart, hands behind your back, palms on your lower back. Bend deeply forward, hold for 2-3 seconds and return to the starting position. Then repeat the tilt. The maximum number of inclinations is 8-10. The exercise is best performed at a slow pace, inhale when bending over, and exhale when returning to the starting position.
Exercise No. 5. Starting position: standing, arms shoulder-width apart, arms hanging freely along the body. Bend forward, pull your arms down, trying to touch the floor. Hold for 3-4 seconds and return to the starting position. The maximum number of inclinations is 7–8. When bending forward, take a deep breath, when returning to the starting position, exhale. The exercise should be performed at a slow pace, smoothly, without jerking, and with extreme caution. With radiculitis, a lumbago may occur in this position, and it will be quite difficult to straighten up. A slow pace and smooth movement will eliminate such trouble.
Exercise No. 6. Starting position: standing, feet shoulder-width apart, hands on the waist. Make a rotational movement with your body from left to right, describing an arc, and, without stopping, from right to left to return to the starting position. Rotational movements can also be performed from right to left. The pace of the exercise is slow, the maximum number of rotations is 5–6, the movements are smooth, without jerking.
Exercise No. 7. Starting position: standing, feet shoulder-width apart, arms hanging freely along the body. Place your palms on the front of your thighs and bend forward so that your palms slide along your thighs to your knees. Touch your knees with your palms, hold for 3-4 seconds and return to the starting position. It is best to perform the exercise at a slow pace, smoothly, without jerking. When bending, inhale, when straightening, exhale. The maximum number of inclinations is 8-10.
Exercise No. 8. Starting position: standing, legs together, hands on the belt. Do a half squat and return to the starting position. If it is difficult to perform the exercise with your hands on your belt, you can use the back of a chair as a support. The maximum number of half squats is 7–8. Movements when performing the exercise should be smooth, without jerking.
Exercise No. 9. Starting position: standing, legs together, hands on the belt. Do a half squat. At the same time, extend your arms forward. Stay in this position for 3-4 seconds, then return to the starting position. The maximum number of half squats is 6–8. The exercise is performed at a slow pace, inhale when half-squatting, and exhale when returning to the starting position. It is better not to increase the pace of the exercise; try to do all movements smoothly, without jerking.
Exercise No. 10. Starting position: standing, legs together, hands on the belt or freely lowered along the body. Raise your left leg, bending it at the knee, hold it for 2-3 seconds, return to the starting position. Do a similar movement with your right foot. The number of bends can be 6–8, the maximum is 12. Movements should be performed smoothly, without jerking, to avoid pain. When bending your leg, inhale, when returning to the starting position, exhale.
Exercise No. 11. Starting position: standing, legs together, arms hanging freely along the body. Raise your arms and spread them to the sides, in this position tilt to the left. Hold for 2-3 seconds, return to the starting position. Lean to the left 3-4 times, change position and bend to the right. The maximum number of inclinations is 10–12. You can alternate tilts to the left and right, doing 2 in each direction. The pace of the exercise is slow and medium, alternation is acceptable, for example, slow - 3 times, medium - 4 times, slow - 3 times.
Exercise No. 12. Starting position: standing, arms freely lowered along the body, legs together. Raise your arms and spread them to the sides. Make a left turn, hold for 3-4 seconds and return to the starting position. After making turns to the left 3-4 times, start turning to the right. The maximum number of turns is 10–12. You can alternate turns to the right and left, making 2 in each direction. The pace of the movements is slow or medium, but you can also change it during the exercise.
Exercise No. 13. Starting position: standing, legs together, arms hanging freely along the body. Raise your arms, stretch as far as possible, lower your arms, return to the starting position. Do the exercise 10–12 times at a slow pace. When raising your arms, take a deep breath, and when returning to the starting position, exhale.
Exercise No. 14. Starting position: lying on your back, placing a small cushion under your head. Bend one leg at the knee, clasp your fingers and try to gently pull your thigh to your chest (Fig. 42). In this case, the lower back should be pressed to the floor, and the pelvis should be slightly raised. Do the exercise 3-4 times with one leg, then the other. The pace of the exercise is slow, the movements are smooth, without jerking.
Exercise No. 15. Starting position: lying on your back, legs straight, feet slightly bent, hands clasped and placed on your stomach. Raise your straightened arms, without opening them, vertically upward (Fig. 43). Hold this for 3-4 seconds and return to the starting position. Do the exercise 10–12 times at a slow pace. When raising your arms, take a deep breath, and when returning to the starting position, exhale. If there is no pain, the exercise can be diversified: when your arms are raised, do not immediately return to the starting position, but bring them further, trying to touch the floor with your clasped hands. Stay in this position for 2-3 seconds and then return to the starting position.

Exercise No. 16. Starting position: lying on your back, placing a cushion under your head, legs straightened, arms freely positioned along the body. Grab your lower thighs with your hands, pull your knees towards your stomach (Fig. 44). Hold this for 3-4 seconds, then return to the starting position. Perform the exercise at a slow pace, the maximum number of pull-ups is 8-10. If no pain is observed, then you can use one more action: when the knees are pulled up to the stomach, do not immediately return to the starting position, but swing your knees in different directions 3-4 times.

Exercise No. 17. Starting position: lying on your stomach, legs straight, arms bent at the elbows, palms pressed to the floor (Fig. 45). Pressing your palms firmly into the floor, lift your pelvic area. Hold this for 3-4 seconds and return to the starting position. The exercise is performed at a slow pace, as smoothly as possible, without jerking. The maximum number of movements is 5–6. When performing this exercise, you should listen to yourself to see if pain occurs. When they appear, you must immediately stop moving.

Exercise No. 18. Starting position: lying on your stomach, legs straight, elbows and palms on the floor (Fig. 46). Leaning on your palms, raise your head and shoulders as much as possible. Stay in this position for 3-4 seconds and return to the starting position. At the same time, the back muscles become very tense, and the hands do not leave the floor. The movements are smooth, without jerking, the pace of the exercise is slow. The maximum number of movements is 10–12.

This exercise completes the set of additional exercises that are used in therapeutic exercises for lumbosacral radiculitis.
Radiculitis is a pinched nerve root. This is not an independent disease, but a pathology of the peripheral nervous system, which is characterized by severe pain, limited mobility of the spine at the site of injury and temporary disability.
Exercise for radiculitis
Physical exercise for this pathology is an integral part, which, in addition, includes taking painkillers from the group of non-steroidal anti-inflammatory drugs, muscle relaxants, B vitamins and those that have a local effect on the area of inflammation.
Cervical
This part of the spine is the most fragile. It consists of the smallest vertebrae, and pinched nerve roots occur here quite often. Exercises are aimed at ensuring flexibility of the spine, strengthening the muscle corset, and relieving tension:
- Sit or stand with your hand holding onto some support. Slowly turn your head to the right 90 degrees, then to the left. The number of repetitions for acute radiculitis is as long as the condition allows, for chronic radiculitis - from 5 times. Increase the number of repetitions by 1 each day until you reach 15.
- Sit or stand with your hand holding onto some support. Lower your head forward, lift it, move it back, trying to touch the back of your head to your shoulder blades. Movements are slow, smooth, pain is excluded. In the acute period, repeat no more than 5 times.
- Make rotational movements with your head: slowly lower it, then roll it to the right, trying to touch your shoulder with your ear, then back, with the back of your head along your shoulder blades, then touch your ear to your left shoulder and return to the starting position.
Thoracic department
In this part of the back, the vertebrae are larger; they are surrounded by a fairly strong corset of muscles. Therefore it is rare. However, if such misfortune does occur, physical exercise will help cope with pain and stiffness:
- Exercise to stretch the thoracic spine. It can only be performed while lying down. Reach your arms back and place them on the floor. Start stretching your fingers in one direction, your toes in the other. Feel the spine stretch. The number of such stretches is 5 times.
- . Performed while lying down. Bend your legs at the knees, clasp them with your hands and bring your face as close to your knees as possible. Relax in a horizontal position. Repeat at least 5 times.
- Exercise to strengthen the pectoral muscle corset. Starting position - face down on the floor, hands at your sides. Lift your front head and shoulders and hold this position for 5-10 seconds. Relax while lying down. Repeat at least 5 times.
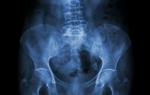
Lumbar

This part of the spine constantly experiences maximum stress. The vertebrae here are large, but this does not relieve the lumbar region from pinched nerves. Usually “”, as this pathology is popularly called, comes unexpectedly - a person can neither straighten up nor move, appearing to be not paralyzed, but at the same time completely incapacitated.
Some exercises will help stretch the spine in the lumbar region and slightly relieve pain:
- Get on all fours. Imitate the movements of a cat that has just woken up: stretch with one hand, then with the other, pushing your pelvis up. Then gently bend your back in the lower back and stay in this position for a couple of seconds. Then bend in the opposite direction, feel how the spine stretches. The exercise is done once, in the morning, almost immediately after sleep.
- Lie on your back, arms at your sides, legs bent at the knees. Lift your pelvis off the floor, trying to arch. It’s ideal if you can bend your lower back at least a little. Hold this position for a few seconds and lower yourself to the floor. Repeat 5 or more times, depending on the condition.
- Lying on your stomach, arms extended in front of you, legs straight. Lift your arms and legs off the floor, hold the position for 5 seconds, then relax. Repeat 5 or more times.
Exercise therapy for radiculitis

Always complements drug and physiotherapeutic treatment for most spinal diseases. The difference with regular exercises performed without a doctor’s prescription is significant:
- Therapeutic exercises for radiculitis are prescribed by a specialist after a detailed examination.
- All movements are worked out under the supervision of a doctor-trainer.
- The load is given in increasing order - from simple exercises to complex ones.
- The patient's condition is monitored.
- After the course, a repeat examination is carried out, the dynamics are recorded and adjustments are made in accordance with the results.
Some physical therapy exercises can be performed at home after a course conducted under the supervision of a trainer.
Contraindications
There are few prohibitions on physical activity. These are acute infectious diseases, severe pain (period of acute inflammation), the general serious condition of the patient, problems with the cardiovascular system (decompensation of the heart).
In other cases, feasible physical activity will benefit the patient from any part of the spine, including the lumbar spine.
Class Rules
Engaging in therapeutic physical exercises is allowed only during the period of remission. This is the main condition for gymnastics for radiculitis. Other requirements are no less important:
- It is prohibited to exercise if you have pain. If you feel pain during the next exercise, stop. It's better to tell your doctor about this.
- Don't exercise on a bare floor. Lay yourself either a special rug or a warm blanket, folding it in several layers. The last option is preferable, as it will protect your back from drafts.
- For home activities, dress in cotton, comfortable clothes. To work in the exercise therapy room, purchase comfortable shoes.
- Don't drink while exercising. If you need rest, prefer breathing exercises and relaxation.
- Do muscle relaxation exercises first. Only after this start pumping them up.
- The minimum duration of the course is 2 months. Gymnastics for problems with the spine has a cumulative effect. The first improvements will be noticeable no earlier than in a month.
- Avoid all sudden movements, jolts and twisting. The main task is to relax tight muscles and strengthen the corset that holds the spine.
Pilates exercises for radiculitis

The basis of such classes is to work on muscle groups that are never used even during exercise therapy. All Pilates exercises are performed slowly and smoothly. You need to enjoy them, feeling every muscle of your body. There are no absolute contraindications to such activities.
All Pilates exercises for the spine are divided into 3 groups: those performed on the floor, those performed with various objects, and training loads. You can learn the following few exercises on your own:
- Relaxation of the back muscles. Starting position: kneeling. Sit on your heels, lean forward and touch the floor with your palms (lay them flat). At the same time, try not to lift your butt off your heels, otherwise the whole point of the exercise will be lost. Stretch your fingers forward, feeling the muscles of your entire back relax and your spine stretch. Watch your breathing, it should be free. Number of repetitions – from 5 times, depending on physical fitness.
- Spinal stretch. Sit on the floor, feet shoulder-width apart, toes pointing towards you, straighten your back. Stretch your arms forward and imagine that there is a large inflatable ball in front of you. Start wrapping your body around him, rounding his spine. Return to the starting position. Then bend over to one foot, clasping it with your hands, then to the other. Number of repetitions minimum 5.
- Strengthening the back muscles. This exercise is quite difficult for a beginner with poor physical fitness, but its benefits for strengthening the abdominal muscles are invaluable. Lie on your back, hands clasped under your head, legs extended, together. Raise your upper body, simultaneously bend one leg at the knee and lift the other off the floor. Imagine that you are riding a bicycle. Legs can be bent at any angle no more than 90 degrees. The minimum load is 10 “bicycle” movements.
Radiculitis is not so scary for an active person. Therefore, try to force yourself to do something useful every day - warm up in between sitting at the computer, walk in the fresh air. Physical exercise is the basis of human health. Without them, he turns into a disabled person.
Exercises for radiculitis of the lumbar spine are perhaps the most effective means to curb the disease, especially in the initial stage of its development. Principle It’s simple here: training strengthens the muscles, which in turn pulls the vertebrae together, preventing them from releasing pressure on the intervertebral discs. Thus, the discs are deprived of the opportunity to move to the side and pinch the lateral branches extending from the spinal cord, innervating the lower limbs.
These branches (roots) are called radixes in Latin. Hence the name – radiculitis. “It” is a suffix used in medicine to denote inflammation. That is, exactly what happens when the roots are injured by contacting vertebrae.
Gymnastics for radiculitis allows you not only to stop the development of the inflammatory process, but also to reduce it to nothing along with all the symptoms. It normalizes impaired blood circulation and stimulates the exchange of mineral salts, vitamins and other substances necessary to nourish the lumbar region. What , ultimately, relieves you of the most annoying companion of radiculitis - constant, excruciating pain.
Successful use of exercise therapy for radiculitis requires following certain rules. They include a number of fundamental provisions:
- The entire set of exercises must be agreed upon with a doctor. It is also necessary to consult with him in case of any difficulties during the course of treatment.
- If you have serious pain in the lower back, do not start exercising. Analgesics are also not advisable at the first stage. You need to focus only on your own capabilities.
- Start your workout with slow movements. Sharpness and increased loads are permissible only with sufficient preparation. This mode is the most physiological for the spine.
- All manifestations of pain should be alarming: it is necessary to either slow down the pace of exercise or consult a doctor if the pain does not subside. It can change the exercise configuration.
- The number of repetitions of each exercise should be increased in accordance with physical capabilities, aiming for a maximum by the end of the exercise therapy course.
- Conduct training regularly and purposefully: preferably several times a day, focusing all loads on the lumbar region. Only systematic training will lead to the desired goal.
- The room for gymnastics for radiculitis should be constantly ventilated, clothing should be spacious and not restrict movement.

- Be sure to read:
And the most important condition for achieving success is an extremely positive attitude.
Exercise therapy training course
The main task of this complex is to strengthen the muscular frame of the lumbar spine. This is achieved indirectly: all exercises are performed with tension in the abdominal muscles, which pulls the lower back towards itself.
Each exercise should be repeated from 5 to 15 times. At the initial stage of training, it is preferable to stick to the lower bar.
- The first exercise is performed on your back, in a lying position. Arms are extended along the hips with support on the heels, the feet of both legs are pulled back, and the palms of both hands are placed on the stomach. As you inhale, tighten your abs with a short breath-hold at maximum (the lower back should bend slightly). If pain occurs, you can perform a lighter version - without bending your knees.
- The starting position is the same: bend your legs slightly at the knees, resting on your feet. You need to lift your shoulders and shoulder blades off the floor, transferring the main load to the abs, and fix the position at maximum for a few seconds. Return to the starting point, relax. Repeat the exercises 5-15 times, according to the above regulations. A more complicated version - hands are placed behind the head when performing movements.
- The exercise is performed with support on your back, arms extended on the floor parallel to your hips. Bend your left leg at the knee joint, lift it above the floor, fix the position for 2-3 seconds. Straighten your leg, thereby increasing muscle tone in your abdomen. Do the usual number of repetitions and duplicate the same exercise with the right leg, then with both legs together. At the initial stage, 5 - 10 repetitions for each task are enough.
- Support on your back, arms along your hips, legs bent at the knees. Raise your left arm above the floor and place your palm on your right knee. Bend the right knee joint with abdominal tension, bringing it closer to the chest (the left hand should counteract this). Continue the “fight” for at least 10 seconds. Duplicate the exercise on the left leg.
- It is done on the floor in the “lying on your back” position. Legs and arms are extended parallel to each other. Raise your legs, lifting them off the floor by 30 centimeters, and fix the pose. Slowly, leaning on your abs, lower your legs to their original place. To complicate the task, you can put your hands behind your head.
- The starting position is similar to the previous one; for balance, place the palms of both hands on the floor and pull your knees towards your stomach. Imitate riding a bicycle with your feet: as if twisting the pedals (“twist” 10-15 times in the directions “away from you” and “toward you”). Continue for 1-3 minutes depending on the capabilities of the press.
- The load on the lumbar spine is carried out from the “lying” position. It is necessary to rest your palms on the floor, lift your outstretched legs from the floor by about 25-30 centimeters, and fix the position for a second. Spread to the side, and then cross your legs one over one in a horizontal plane, making a kind of “scissors”. To increase the load on the lower back, the exercise should be performed with your hands behind your head.
- Performed on the floor. Lie on your back, extend your arms parallel to your legs. From this position, bend your knees slightly, relying on the heels of both legs and the area of your shoulder blades, lift your lower back off the floor and try to reach the “bridge” (the arc should be as wide as possible). Hold the achieved position for at least 5 seconds. Return to the starting position, rest and repeat the task at least 10 times.
- From a position similar to the previous one, bend your legs pressed together, spread your arms to the sides, and rest your palms on the floor for balance. Cross your legs first to the right, then to the left from the projection of the torso with tension on the abs and lower back. The number of repetitions is standard.
- Lie on your stomach, place the backs of both hands under your chin. Raise your right and left legs up alternately, holding the maximum lift for about 10 seconds. 10-15 reps.
- It is also performed on the stomach. You should lie on the floor, spread your arms wide to the side until you feel tension in the lower back, “throw” your arms forward, as when swimming “breaststroke”, bring your hands to your shoulders, then spread your arms again. The number of repetitions is normal.
- Lie down with your back on the floor, stretch both arms straight forward. Then, with tension on the lumbar region, raise your right arm and left leg and hold the position for a few seconds. Relax and perform the same task with opposite limbs. A total of 5-15 times.
- Without changing the position of the body in the previous task, place your hands behind your back, clasp them using the “lock” method, raising your shoulders, bring them together at the shoulder blades, and relax. Mode – up to 15 repetitions.
- Strengthening the lateral muscles of the lower back. From the same position “on your back”, bend your legs, clasp your knees with your hands, clasping your fingers in a “lock”, pull your legs to your chest, tilt your torso alternately to one side in different directions from 5 to 15 times.
- Modification of the previous exercise: the body body, with knees tucked, rises up, then returns to place. Thus, the anterior and posterior muscles of the lower back, as well as the sacral spine, are strengthened.
- Be sure to read:
Systematic approach
In conclusion, it is worth repeating that exercise therapy for radiculitis of the lumbar spine gives lasting encouraging results only with systematic training. Largest The therapeutic effect is achieved by combining physical exercises with additional procedures, such as:
- Manual and physiotherapy;
- Acupuncture;
- Water aerobics;
- Forced stretching of the lower back on the simulator.

- Interesting read:
Hirudotherapy stimulates blood circulation well: leeches relieve swelling and suck out stagnant blood. Walking in the fresh air and a diet with a predominance of mineral salts and vitamins are beneficial. All this, taken together, is quite capable of stopping the disease and returning the victim to a normal, healthy life.